光子网络(经典)初学者指南
Photon Network 是 Unity 的一项服务,允许开发者创建实时多人游戏。
它提供了强大且易于使用的API,即使对于新手开发人员来说也是完美的。
在这篇文章中,我们将下载必要的文件、设置 Photon AppID 以及编写一个简单的多人游戏示例。
第 1 部分:设置光子网络
第一步是从 Asset Store 下载 Photon Network 包。它包含多人集成所需的所有脚本和文件。
- 打开 Unity 项目,然后转到 Asset Store:(窗口 -> 常规 -> AssetStore)或按 Ctrl+9
- 搜索“Photon Unity Networking Classic - Free”,然后单击第一个结果或 单击此处
- 下载完成后导入Photon包


- 导入包后,您需要创建一个 Photon App ID,这是在他们的网站上完成的:https://www.photonengine.com/
- 创建一个新帐户(或登录到您现有的帐户)
- 单击配置文件图标,然后单击 "Your Applications" 或点击以下链接转到“应用程序”页面:https://dashboard.photonengine.com/en-US/PublicCloud
- 在应用程序页面上单击 "Create new app"
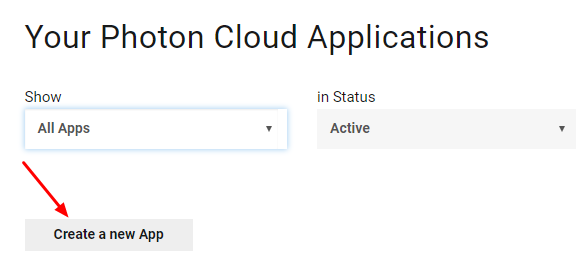
- 在创建页面上,对于光子类型,选择 "Photon Realtime",对于名称,键入任意名称,然后单击 "Create"
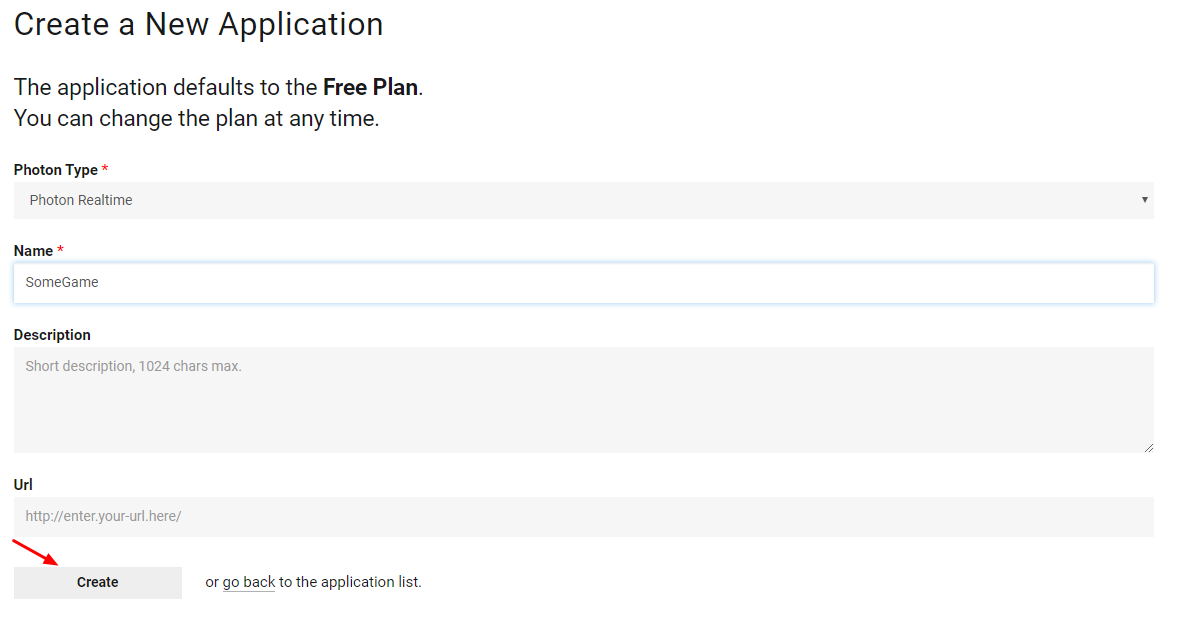
如您所见,应用程序默认为免费计划。您可以在此处阅读有关定价计划 的更多信息
- 创建应用程序后,复制应用程序名称下的应用程序 ID

- 返回到您的 Unity 项目,然后转到 Window -> Photon Unity Networking -> PUN Wizard
- 在 PUN 向导中单击 "Setup Project",粘贴您的应用程序 ID,然后单击 "Setup Project"
- 光子网络现已准备就绪
第 2 部分:创建多人游戏
现在让我们进入实际创建多人游戏的部分。
Photon 中处理多人游戏的方式是:
- 首先,我们连接到光子区域(例如美国东部、欧洲、亚洲等),也称为大厅。
- 进入大厅后,我们请求该区域中创建的所有房间,然后我们可以加入其中一个房间或创建我们自己的房间。
- 加入房间后,我们请求连接到房间的玩家列表并实例化他们的 Player 实例,然后通过 PhotonView 与本地实例同步。
- 当有人离开房间时,他们的实例将被销毁,并从玩家列表中删除。
1. 设置大厅
让我们首先创建一个 MainMenu,它将包含一个大厅逻辑(浏览现有房间、创建新房间等)。
- 创建一个新场景并调用它 "MainMenu"
- 创建 一个新的 C# 脚本并将其命名为 GameLobby
- 在 MainMenu 场景中创建一个新的 GameObject。将其命名为 "_GameLobby" 并将 GameLobby 脚本附加到其中
现在打开 GameLobby 脚本。
首先,让我们创建所有必要的变量:
    //Our player name
    string playerName = "Player 1";
    //This client's version number. Users are separated from each other by gameversion (which allows you to make breaking changes).
    string gameVersion = "0.9";
    //The list of created rooms
    RoomInfo[] createdRooms = new RoomInfo[0];
    //Use this name when creating a Room
    string roomName = "Room 1";
    Vector2 roomListScroll = Vector2.zero;
    bool joiningRoom = false;
接下来我们需要做的是启用自动加入大厅和大厅统计,这将使我们能够接收房间列表。这是在 void Start() 中完成的。
此外,我们启用了automaticSyncScene,因此一旦我们加入房间,场景就会自动同步。
最后,我们调用 PhotonNetwork.ConnectUsingSettings 进行连接。
    // Use this for initialization
    void Start()
    {
        //Automatically join Lobby after we connect to Photon Region
        PhotonNetwork.PhotonServerSettings.JoinLobby = true;
        //Enable Lobby Stats to receive the list of Created rooms
        PhotonNetwork.PhotonServerSettings.EnableLobbyStatistics = true;
        //This makes sure we can use PhotonNetwork.LoadLevel() on the master client and all clients in the same room sync their level automatically
        PhotonNetwork.automaticallySyncScene = true;

        if (!PhotonNetwork.connected)
        {
            // Connect to the photon master-server. We use the settings saved in PhotonServerSettings (a .asset file in this project)
            PhotonNetwork.ConnectUsingSettings(gameVersion);
        }
    }
要知道与 Photon Cloud 的连接是否成功,我们必须实现这 2 个回调:OnReceivedRoomListUpdate() 和 OnFailedToConnectToPhoton(objectparameters)。
    void OnFailedToConnectToPhoton(object parameters)
    {
        Debug.Log("OnFailedToConnectToPhoton. StatusCode: " + parameters + " ServerAddress: " + PhotonNetwork.ServerAddress);
        //Try to connect again
        PhotonNetwork.ConnectUsingSettings(gameVersion);
    }

    void OnReceivedRoomListUpdate()
    {
        Debug.Log("We have received the Room list");
        //After this callback, PhotonNetwork.GetRoomList() becomes available
        createdRooms = PhotonNetwork.GetRoomList();
    }
接下来是UI部分,在这里完成Room浏览和Room创建:
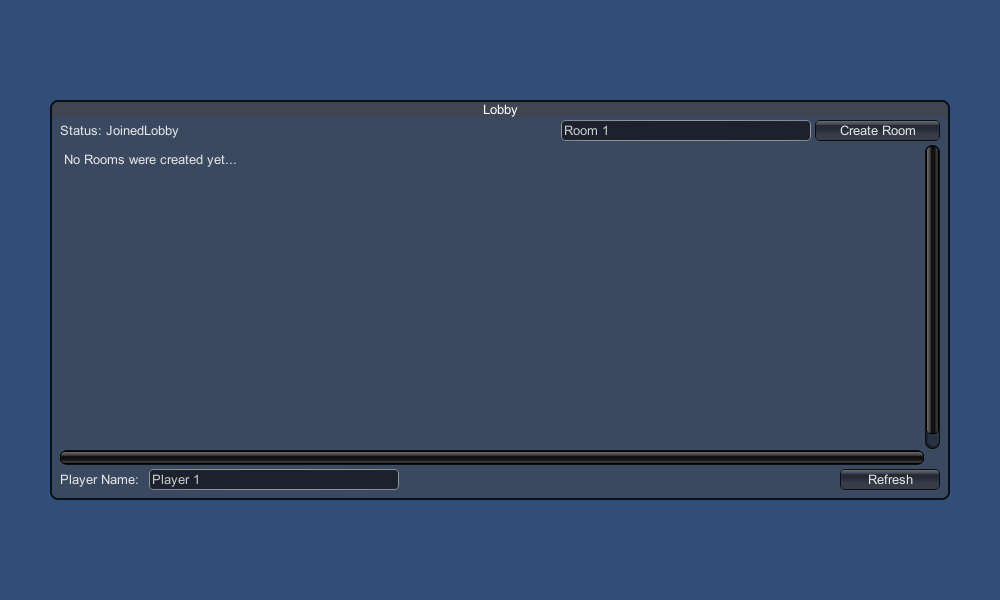
最后我们实现另外 4 个回调: OnPhotonCreateRoomFailed()、OnPhotonJoinRoomFailed(object[] Cause)、OnCreatedRoom() 和 OnJoinedRoom() 。
这些回调用于确定我们是否加入/创建了房间或者连接过程中是否存在任何问题。
    void OnPhotonCreateRoomFailed()
    {
        Debug.Log("OnPhotonCreateRoomFailed got called. This can happen if the room exists (even if not visible). Try another room name.");
        joiningRoom = false;
    }

    void OnPhotonJoinRoomFailed(object[] cause)
    {
        Debug.Log("OnPhotonJoinRoomFailed got called. This can happen if the room is not existing or full or closed.");
        joiningRoom = false;
    }

    void OnCreatedRoom()
    {
        Debug.Log("OnCreatedRoom");
        //Set our player name
        PhotonNetwork.playerName = playerName;
        //Load the Scene called GameLevel (Make sure it's added to build settings)
        PhotonNetwork.LoadLevel("GameLevel");
    }

    void OnJoinedRoom()
    {
        Debug.Log("OnJoinedRoom");
    }
这是最终的 GameLobby.cs 脚本:
using System.Collections;
using System.Collections.Generic;
using UnityEngine;

public class GameLobby : MonoBehaviour
{
    //Our player name
    string playerName = "Player 1";
    //This client's version number. Users are separated from each other by gameversion (which allows you to make breaking changes).
    string gameVersion = "0.9";
    //The list of created rooms
    RoomInfo[] createdRooms = new RoomInfo[0];
    //Use this name when creating a Room
    string roomName = "Room 1";
    Vector2 roomListScroll = Vector2.zero;
    bool joiningRoom = false;

    // Use this for initialization
    void Start()
    {
        //Automatically join Lobby after we connect to Photon Region
        PhotonNetwork.PhotonServerSettings.JoinLobby = true;
        //Enable Lobby Stats to receive the list of Created rooms
        PhotonNetwork.PhotonServerSettings.EnableLobbyStatistics = true;
        //This makes sure we can use PhotonNetwork.LoadLevel() on the master client and all clients in the same room sync their level automatically
        PhotonNetwork.automaticallySyncScene = true;

        if (!PhotonNetwork.connected)
        {
            // Connect to the photon master-server. We use the settings saved in PhotonServerSettings (a .asset file in this project)
            PhotonNetwork.ConnectUsingSettings(gameVersion);
        }
    }

    void OnFailedToConnectToPhoton(object parameters)
    {
        Debug.Log("OnFailedToConnectToPhoton. StatusCode: " + parameters + " ServerAddress: " + PhotonNetwork.ServerAddress);
        //Try to connect again
        PhotonNetwork.ConnectUsingSettings(gameVersion);
    }

    void OnReceivedRoomListUpdate()
    {
        Debug.Log("We have received the Room list");
        //After this callback, PhotonNetwork.GetRoomList() becomes available
        createdRooms = PhotonNetwork.GetRoomList();
    }

    void OnGUI()
    {
        GUI.Window(0, new Rect(Screen.width/2 - 450, Screen.height/2 - 200, 900, 400), LobbyWindow, "Lobby");
    }

    void LobbyWindow(int index)
    {
        //Connection Status and Room creation Button
        GUILayout.BeginHorizontal();

            GUILayout.Label("Status: " + PhotonNetwork.connectionStateDetailed);

            if(joiningRoom || !PhotonNetwork.connected)
            {
                GUI.enabled = false;
            }

            GUILayout.FlexibleSpace();

            //Room name text field
            roomName = GUILayout.TextField(roomName, GUILayout.Width(250));

            if (GUILayout.Button("Create Room", GUILayout.Width(125)))
            {
                if (roomName != "")
                {
                    joiningRoom = true;

                    RoomOptions roomOptions = new RoomOptions();
                    roomOptions.IsOpen = true;
                    roomOptions.IsVisible = true;
                    roomOptions.MaxPlayers = (byte)10; //Set any number

                    PhotonNetwork.JoinOrCreateRoom(roomName, roomOptions, TypedLobby.Default);
                }
            }

        GUILayout.EndHorizontal();

        //Scroll through available rooms
        roomListScroll = GUILayout.BeginScrollView(roomListScroll, true, true);

            if(createdRooms.Length == 0)
            {
                GUILayout.Label("No Rooms were created yet...");
            }
            else
            {
                for(int i = 0; i < createdRooms.Length; i++)
                {
                    GUILayout.BeginHorizontal("box");
                    GUILayout.Label(createdRooms[i].Name, GUILayout.Width(400));
                    GUILayout.Label(createdRooms[i].PlayerCount + "/" + createdRooms[i].MaxPlayers);

                    GUILayout.FlexibleSpace();

                    if (GUILayout.Button("Join Room"))
                    {
                        joiningRoom = true;

                        //Set our Player name
                        PhotonNetwork.playerName = playerName;

                        //Join the Room
                        PhotonNetwork.JoinRoom(createdRooms[i].Name);
                    }
                    GUILayout.EndHorizontal();
                }
            }

        GUILayout.EndScrollView();

        //Set player name and Refresh Room button
        GUILayout.BeginHorizontal();

            GUILayout.Label("Player Name: ", GUILayout.Width(85));
            //Player name text field
            playerName = GUILayout.TextField(playerName, GUILayout.Width(250));

            GUILayout.FlexibleSpace();

            GUI.enabled = PhotonNetwork.connectionState != ConnectionState.Connecting && !joiningRoom;
            if (GUILayout.Button("Refresh", GUILayout.Width(100)))
            {
                if (PhotonNetwork.connected)
                {
                    //We are already connected, simply update the Room list
                    createdRooms = PhotonNetwork.GetRoomList();
                }
                else
                {
                    //We are not connected, estabilish a new connection
                    PhotonNetwork.ConnectUsingSettings(gameVersion);
                }
            }

        GUILayout.EndHorizontal();

        if (joiningRoom)
        {
            GUI.enabled = true;
            GUI.Label(new Rect(900/2 - 50, 400/2 - 10, 100, 20), "Connecting...");
        }
    }

    void OnPhotonCreateRoomFailed()
    {
        Debug.Log("OnPhotonCreateRoomFailed got called. This can happen if the room exists (even if not visible). Try another room name.");
        joiningRoom = false;
    }

    void OnPhotonJoinRoomFailed(object[] cause)
    {
        Debug.Log("OnPhotonJoinRoomFailed got called. This can happen if the room is not existing or full or closed.");
        joiningRoom = false;
    }

    void OnCreatedRoom()
    {
        Debug.Log("OnCreatedRoom");
        //Set our player name
        PhotonNetwork.playerName = playerName;
        //Load the Scene called GameLevel (Make sure it's added to build settings)
        PhotonNetwork.LoadLevel("GameLevel");
    }

    void OnJoinedRoom()
    {
        Debug.Log("OnJoinedRoom");
    }
}
2. 创建播放器预制件
在多人游戏中,Player 实例有 2 个方面:本地和远程。
本地实例由本地(由我们)控制。
另一方面,远程实例是其他玩家正在执行的操作的本地表示。它应该不受我们输入的影响。
为了确定实例是本地实例还是远程实例,我们使用 PhotonView 组件。
PhotonView 充当接收和发送需要同步的值的信使,例如位置和旋转。
因此,让我们从创建播放器实例开始(如果您已经准备好播放器实例,则可以跳过此步骤)。
在我的例子中,Player 实例将是一个简单的立方体,使用 W 和 S 键移动并使用 A 和 D 键旋转。
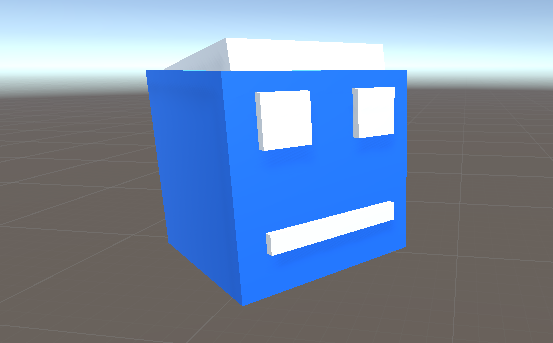

这是一个简单的控制器脚本:
PlayerController.cs
using UnityEngine;

public class PlayerController : MonoBehaviour
{
    // Update is called once per frame
    void Update()
    {
        //Move Front/Back
        if (Input.GetKey(KeyCode.W))
        {
            transform.Translate(transform.forward * Time.deltaTime * 2.45f, Space.World);
        }
        else if (Input.GetKey(KeyCode.S))
        {
            transform.Translate(-transform.forward * Time.deltaTime * 2.45f, Space.World);
        }

        //Rotate Left/Right
        if (Input.GetKey(KeyCode.A))
        {
            transform.Rotate(new Vector3(0, -14, 0) * Time.deltaTime * 4.5f, Space.Self);
        }
        else if (Input.GetKey(KeyCode.D))
        {
            transform.Rotate(new Vector3(0, 14, 0) * Time.deltaTime * 4.5f, Space.Self);
        }
    }
}
下一步是添加 PhotonView 组件。
我们需要做的第一件事就是用 Photon.MonoBehaviour 替换 MonoBehaviour。为了能够使用缓存的 photonView 变量而不是使用 GetComponent<PhotonView>(),此步骤是必需的。
public class PlayerNetworkSync : Photon.MonoBehaviour之后,我们可以创建所有必要的变量:
    //List of the scripts that should only be active for the local player (ex. PlayerController, MouseLook etc.)
    public MonoBehaviour[] localScripts;
    //List of the GameObjects that should only be active for the local player (ex. Camera, AudioListener etc.)
    public GameObject[] localObjects;
    //Values that will be synced over network
    Vector3 latestPos;
    Quaternion latestRot;
然后在 void Start() 中,我们使用 photonView.isMine 检查玩家是本地还是远程:
    // Use this for initialization
    void Start()
    {
        if (photonView.isMine)
        {
            //Player is local
        }
        else
        {
            //Player is Remote
            for(int i = 0; i < localScripts.Length; i++)
            {
                localScripts[i].enabled = false;
            }
            for (int i = 0; i < localObjects.Length; i++)
            {
                localObjects[i].SetActive(false);
            }
        }
    }
实际的同步是通过PhotonView的回调完成的: OnPhotonSerializeView(PhotonStream stream, PhotonMessageInfo info):
    void OnPhotonSerializeView(PhotonStream stream, PhotonMessageInfo info)
    {
        if (stream.isWriting)
        {
            //We own this player: send the others our data
            stream.SendNext(transform.position);
            stream.SendNext(transform.rotation);
        }
        else
        {
            //Network player, receive data
            latestPos = (Vector3)stream.ReceiveNext();
            latestRot = (Quaternion)stream.ReceiveNext();
        }
    }
在本例中,我们仅发送玩家位置和旋转,但您可以使用上面的示例以高频率发送需要通过网络同步的任何值。
然后将接收到的值应用到 void Update() 中:
    // Update is called once per frame
    void Update()
    {
        if (!photonView.isMine)
        {
            //Update remote player (smooth this, this looks good, at the cost of some accuracy)
            transform.position = Vector3.Lerp(transform.position, latestPos, Time.deltaTime * 5);
            transform.rotation = Quaternion.Lerp(transform.rotation, latestRot, Time.deltaTime * 5);
        }
    }
这是最终的 PlayerNetworkSync.cs 脚本:
using System.Collections;
using System.Collections.Generic;
using UnityEngine;

public class PlayerNetworkSync : Photon.MonoBehaviour
{
    //List of the scripts that should only be active for the local player (ex. PlayerController, MouseLook etc.)
    public MonoBehaviour[] localScripts;
    //List of the GameObjects that should only be active for the local player (ex. Camera, AudioListener etc.)
    public GameObject[] localObject;
    //Values that will be synced over network
    Vector3 latestPos;
    Quaternion latestRot;

    // Use this for initialization
    void Start()
    {
        if (photonView.isMine)
        {
            //Player is local
        }
        else
        {
            //Player is Remote
            for(int i = 0; i < localScripts.Length; i++)
            {
                localScripts[i].enabled = false;
            }
            for (int i = 0; i < localObject.Length; i++)
            {
                localObject[i].SetActive(false);
            }
        }
    }

    void OnPhotonSerializeView(PhotonStream stream, PhotonMessageInfo info)
    {
        if (stream.isWriting)
        {
            //We own this player: send the others our data
            stream.SendNext(transform.position);
            stream.SendNext(transform.rotation);
        }
        else
        {
            //Network player, receive data
            latestPos = (Vector3)stream.ReceiveNext();
            latestRot = (Quaternion)stream.ReceiveNext();
        }
    }

    // Update is called once per frame
    void Update()
    {
        if (!photonView.isMine)
        {
            //Update remote player (smooth this, this looks good, at the cost of some accuracy)
            transform.position = Vector3.Lerp(transform.position, latestPos, Time.deltaTime * 5);
            transform.rotation = Quaternion.Lerp(transform.rotation, latestRot, Time.deltaTime * 5);
        }
    }
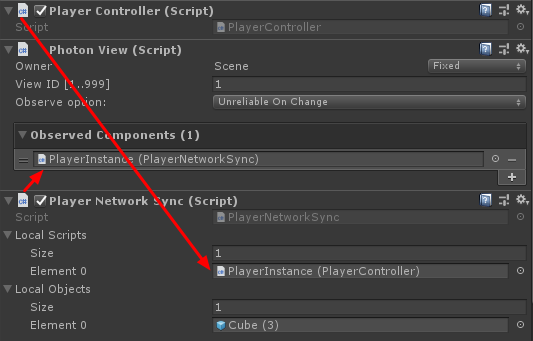
}- 将 PlayerNetworkSync.cs 脚本添加到 PlayerInstance 并将其分配给 PhotonView 观察组件。
- 将 PlayerCntroller.cs 分配给 "Local Scripts" 并将 GameObjects(您想要为远程玩家停用的游戏对象)分配给 "Local Objects"
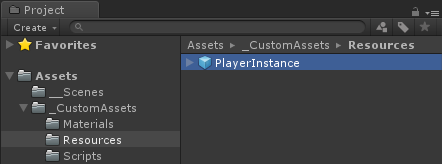
- 将 PlayerInstance 保存到 Prefab 并将其移动到名为 Resources 的文件夹(如果没有这样的文件夹,请创建一个)。为了能够通过网络生成多人游戏对象,此步骤是必需的。
3. 创建游戏关卡
GameLevel 是加入房间后加载的场景,它是所有动作发生的地方。
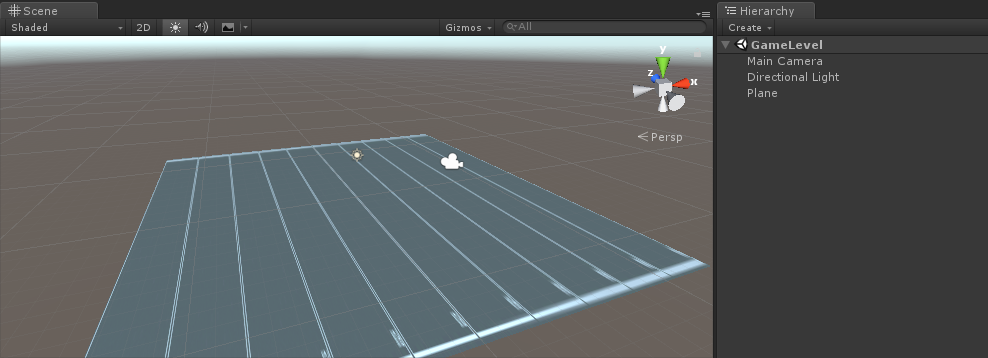
- 创建一个新场景并将其命名为 "GameLevel" (或者,如果您想保留不同的名称,请确保更改 GameLobby.cs 中 PhotonNetwork.LoadLevel("GameLevel"); 行中的名称)。
就我而言,我将使用一个带有平面的简单场景:
- 现在创建一个新脚本并将其命名为 RoomController。该脚本将处理房间内的逻辑(例如生成玩家、显示玩家列表等)。
让我们首先定义必要的变量:
    //Player instance prefab, must be located in the Resources folder
    public GameObject playerPrefab;
    //Player spawn point
    public Transform spawnPoint;
为了实例化 Player 预制件,我们使用 PhotonNetwork.Instantiate:
    // Use this for initialization
    void Start()
    {
        //In case we started this demo with the wrong scene being active, simply load the menu scene
        if (!PhotonNetwork.connected)
        {
            UnityEngine.SceneManagement.SceneManager.LoadScene("MainMenu");
            return;
        }

        //We're in a room. spawn a character for the local player. it gets synced by using PhotonNetwork.Instantiate
        PhotonNetwork.Instantiate(playerPrefab.name, spawnPoint.position, Quaternion.identity, 0);
    }
以及一个带有 "Leave Room" 按钮和一些附加元素(例如房间名称和已连接玩家列表)的简单 UI:
    void OnGUI()
    {
        if (PhotonNetwork.room == null)
            return;

        //Leave this Room
        if (GUI.Button(new Rect(5, 5, 125, 25), "Leave Room"))
        {
            PhotonNetwork.LeaveRoom();
        }

        //Show the Room name
        GUI.Label(new Rect(135, 5, 200, 25), PhotonNetwork.room.Name);

        //Show the list of the players connected to this Room
        for (int i = 0; i < PhotonNetwork.playerList.Length; i++)
        {
            //Show if this player is a Master Client. There can only be one Master Client per Room so use this to define the authoritative logic etc.)
            string isMasterClient = (PhotonNetwork.playerList[i].IsMasterClient ? ": MasterClient" : "");
            GUI.Label(new Rect(5, 35 + 30 * i, 200, 25), PhotonNetwork.playerList[i].NickName + isMasterClient);
        }
    }
最后,我们实现另一个名为 OnLeftRoom() 的 PhotonNetwork 回调,当我们离开房间时会调用它:
    void OnLeftRoom()
    {
        //We have left the Room, return to the MainMenu
        UnityEngine.SceneManagement.SceneManager.LoadScene("MainMenu");
    }
这是最终的 RoomController.cs 脚本:
using UnityEngine;

public class RoomController : MonoBehaviour
{
    //Player instance prefab, must be located in the Resources folder
    public GameObject playerPrefab;
    //Player spawn point
    public Transform spawnPoint;

    // Use this for initialization
    void Start()
    {
        //In case we started this demo with the wrong scene being active, simply load the menu scene
        if (!PhotonNetwork.connected)
        {
            UnityEngine.SceneManagement.SceneManager.LoadScene("MainMenu");
            return;
        }

        //We're in a room. spawn a character for the local player. it gets synced by using PhotonNetwork.Instantiate
        PhotonNetwork.Instantiate(playerPrefab.name, spawnPoint.position, Quaternion.identity, 0);
    }

    void OnGUI()
    {
        if (PhotonNetwork.room == null)
            return;

        //Leave this Room
        if (GUI.Button(new Rect(5, 5, 125, 25), "Leave Room"))
        {
            PhotonNetwork.LeaveRoom();
        }

        //Show the Room name
        GUI.Label(new Rect(135, 5, 200, 25), PhotonNetwork.room.Name);

        //Show the list of the players connected to this Room
        for (int i = 0; i < PhotonNetwork.playerList.Length; i++)
        {
            //Show if this player is a Master Client. There can only be one Master Client per Room so use this to define the authoritative logic etc.)
            string isMasterClient = (PhotonNetwork.playerList[i].IsMasterClient ? ": MasterClient" : "");
            GUI.Label(new Rect(5, 35 + 30 * i, 200, 25), PhotonNetwork.playerList[i].NickName + isMasterClient);
        }
    }

    void OnLeftRoom()
    {
        //We have left the Room, return to the MainMenu
        UnityEngine.SceneManagement.SceneManager.LoadScene("MainMenu");
    }
}- 最后,在 GameLevel 场景中创建一个新的 GameObject 并调用它 "_RoomController"
- 将 RoomController 脚本附加到 _RoomController 对象
- 为其分配 PlayerInstance 预制件和 SpawnPoint Transform,然后保存场景
- 将 MainMenu 和 GameLevel 添加到构建设置中。

4. 进行测试构建
现在是时候进行构建并测试它了:
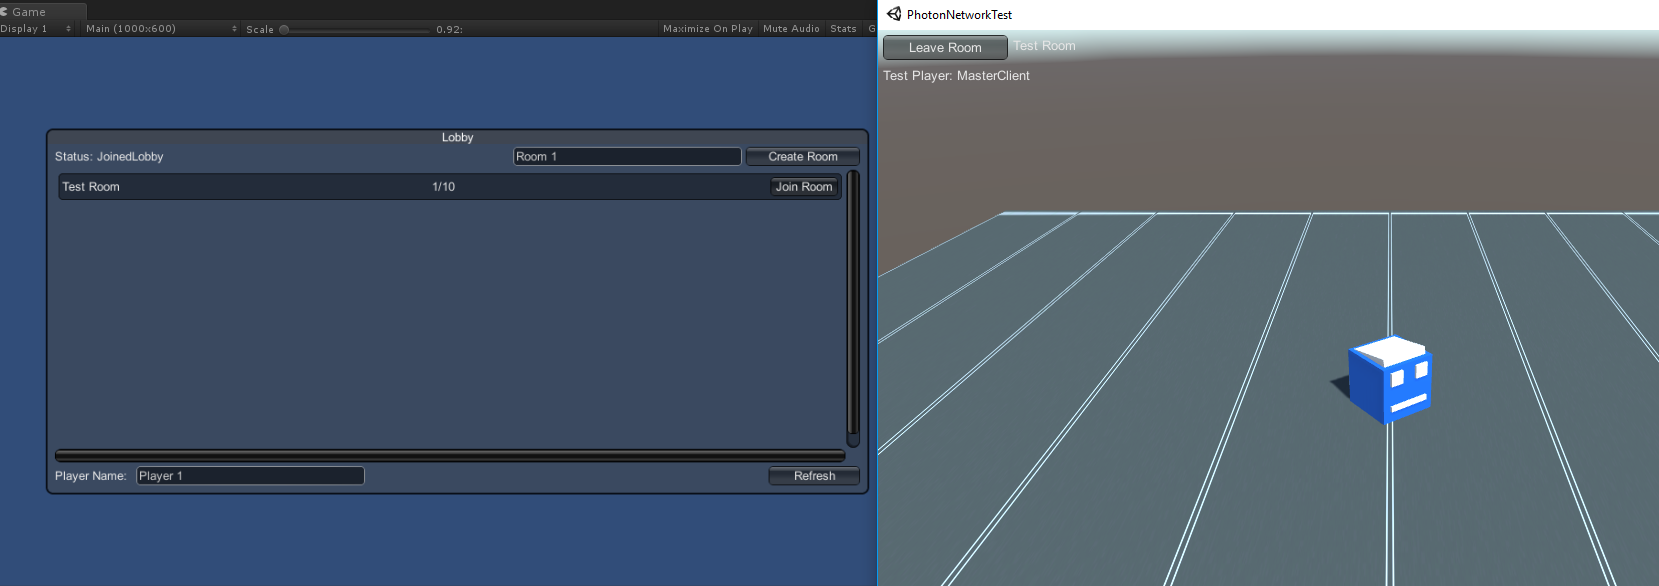

一切都按预期进行!
奖金
远程过程调用
在 Photon Network 中,RPC 代表 Remote procedure Call,它用于调用位于同一房间的远程客户端上的函数(您可以在 here 阅读更多相关信息)。
RPC 有很多用途,例如,假设您需要向房间中的所有玩家发送聊天消息。使用 RPC,这很容易做到。
[PunRPC]
void ChatMessage(string senderName, string messageText)
{
    Debug.Log(string.Format("{0}: {1}", senderName, messageText));
}
注意函数之前的 [PunRPC] 。如果您计划通过 RPC 调用该函数,则此属性是必需的。
要调用标记为 RPC 的函数,您需要一个 PhotonView。调用示例:
PhotonView photonView = PhotonView.Get(this);
photonView.RPC("ChatMessage", PhotonTargets.All, PhotonNetwork.playerName, "Some message");
专业提示:如果您的脚本是 Photon.MonoBehaviour 或 Photon.PunBehaviour 您可以使用:this.photonView.RPC()。
自定义属性
在 Photon Network 中,自定义属性是一个可以分配给玩家或房间的哈希表。
当您需要设置不需要经常更改的持久数据(例如玩家团队名称、房间游戏模式等)时,这非常有用。
首先,您必须定义一个哈希表,这是通过在脚本开头添加以下行来完成的:
//Replace default Hashtables with Photon hashtables
using Hashtable = ExitGames.Client.Photon.Hashtable;
下面的示例设置名为 "GameMode" 和 "AnotherProperty" 的 Room 属性:
        //Set Room properties (Only Master Client is allowed to set Room properties)
        if (PhotonNetwork.isMasterClient)
        {
            Hashtable setRoomProperties = new Hashtable();
            setRoomProperties.Add("GameMode", "FFA");
            setRoomProperties.Add("AnotherProperty", "Test");
            PhotonNetwork.room.SetCustomProperties(setRoomProperties);
        }

        //Will print "FFA"
        print((string)PhotonNetwork.room.CustomProperties["GameMode"]);
        //Will print "Test"
        print((string)PhotonNetwork.room.CustomProperties["AnotherProperty"]);
玩家属性的设置类似:
        //Set our Player's property
        Hashtable setPlayerProperties = new Hashtable();
        setPlayerProperties.Add("PlayerHP", (float)100);
        PhotonNetwork.player.SetCustomProperties(setPlayerProperties);

        //Will print "100"
        print((float)PhotonNetwork.player.CustomProperties["PlayerHP"]);
要删除特定属性,只需将其值设置为 null。
        //Remove property called "PlayerHP" from Player properties
        Hashtable setPlayerProperties = new Hashtable();
        setPlayerProperties.Add("PlayerHP", null);
        PhotonNetwork.player.SetCustomProperties(setPlayerProperties);