如何利用 Unity 中的 AI 支持制作 FPS
第一人称射击游戏 (FPS) 是射击游戏的一个子类型,玩家从第一人称视角进行控制。
要在 Unity 中制作 FPS 游戏,我们需要一个玩家控制器、一系列物品(在本例中为武器)和敌人。
第 1 步:创建播放器控制器
在这里,我们将创建一个供玩家使用的控制器。
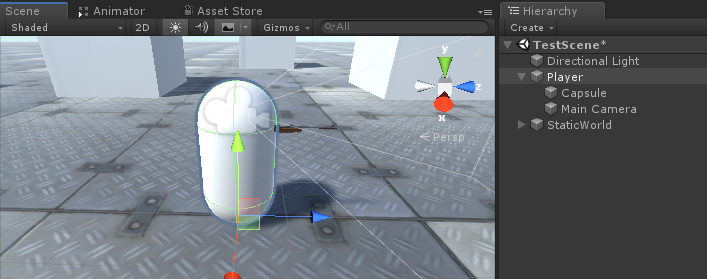
- 创建一个新的游戏对象(游戏对象 -> 创建空)并命名 "Player"
- 创建一个新的胶囊(游戏对象 -> 3D 对象 -> 胶囊)并将其移动到 "Player" 对象内
- 从 Capsule 中移除 Capsule Collider 组件,并将其位置更改为 (0, 1, 0)
- 将主摄像机移动到 "Player" 对象内并将其位置更改为 (0, 1.64, 0)
- 创建 一个新脚本,将其命名为 "SC_CharacterController" 并将以下代码粘贴到其中:
SC_CharacterController.cs
using UnityEngine;

[RequireComponent(typeof(CharacterController))]

public class SC_CharacterController : MonoBehaviour
{
    public float speed = 7.5f;
    public float jumpSpeed = 8.0f;
    public float gravity = 20.0f;
    public Camera playerCamera;
    public float lookSpeed = 2.0f;
    public float lookXLimit = 45.0f;

    CharacterController characterController;
    Vector3 moveDirection = Vector3.zero;
    Vector2 rotation = Vector2.zero;

    [HideInInspector]
    public bool canMove = true;

    void Start()
    {
        characterController = GetComponent<CharacterController>();
        rotation.y = transform.eulerAngles.y;
    }

    void Update()
    {
        if (characterController.isGrounded)
        {
            // We are grounded, so recalculate move direction based on axes
            Vector3 forward = transform.TransformDirection(Vector3.forward);
            Vector3 right = transform.TransformDirection(Vector3.right);
            float curSpeedX = canMove ? speed * Input.GetAxis("Vertical") : 0;
            float curSpeedY = canMove ? speed * Input.GetAxis("Horizontal") : 0;
            moveDirection = (forward * curSpeedX) + (right * curSpeedY);

            if (Input.GetButton("Jump") && canMove)
            {
                moveDirection.y = jumpSpeed;
            }
        }

        // Apply gravity. Gravity is multiplied by deltaTime twice (once here, and once below
        // when the moveDirection is multiplied by deltaTime). This is because gravity should be applied
        // as an acceleration (ms^-2)
        moveDirection.y -= gravity * Time.deltaTime;

        // Move the controller
        characterController.Move(moveDirection * Time.deltaTime);

        // Player and Camera rotation
        if (canMove)
        {
            rotation.y += Input.GetAxis("Mouse X") * lookSpeed;
            rotation.x += -Input.GetAxis("Mouse Y") * lookSpeed;
            rotation.x = Mathf.Clamp(rotation.x, -lookXLimit, lookXLimit);
            playerCamera.transform.localRotation = Quaternion.Euler(rotation.x, 0, 0);
            transform.eulerAngles = new Vector2(0, rotation.y);
        }
    }
}- 将 SC_CharacterController 脚本附加到 "Player" 对象(您会注意到它还添加了另一个名为“字符控制器”的组件,将其中心值更改为 (0, 1, 0))
- 将主摄像机分配给 SC_CharacterController 中的玩家摄像机变量
玩家控制器现已准备就绪:
第2步:创建武器系统
玩家武器系统将由 3 个组件组成:武器管理器、武器脚本和子弹脚本。
- 创建 一个新脚本,将其命名为 "SC_WeaponManager" 并将以下代码粘贴到其中:
SC_WeaponManager.cs
using UnityEngine;

public class SC_WeaponManager : MonoBehaviour
{
    public Camera playerCamera;
    public SC_Weapon primaryWeapon;
    public SC_Weapon secondaryWeapon;

    [HideInInspector]
    public SC_Weapon selectedWeapon;

    // Start is called before the first frame update
    void Start()
    {
        //At the start we enable the primary weapon and disable the secondary
        primaryWeapon.ActivateWeapon(true);
        secondaryWeapon.ActivateWeapon(false);
        selectedWeapon = primaryWeapon;
        primaryWeapon.manager = this;
        secondaryWeapon.manager = this;
    }

    // Update is called once per frame
    void Update()
    {
        //Select secondary weapon when pressing 1
        if (Input.GetKeyDown(KeyCode.Alpha1))
        {
            primaryWeapon.ActivateWeapon(false);
            secondaryWeapon.ActivateWeapon(true);
            selectedWeapon = secondaryWeapon;
        }

        //Select primary weapon when pressing 2
        if (Input.GetKeyDown(KeyCode.Alpha2))
        {
            primaryWeapon.ActivateWeapon(true);
            secondaryWeapon.ActivateWeapon(false);
            selectedWeapon = primaryWeapon;
        }
    }
}- 创建一个新脚本,将其命名为 "SC_Weapon" 并将以下代码粘贴到其中:
SC_Weapon.cs
using System.Collections;
using UnityEngine;

[RequireComponent(typeof(AudioSource))]

public class SC_Weapon : MonoBehaviour
{
    public bool singleFire = false;
    public float fireRate = 0.1f;
    public GameObject bulletPrefab;
    public Transform firePoint;
    public int bulletsPerMagazine = 30;
    public float timeToReload = 1.5f;
    public float weaponDamage = 15; //How much damage should this weapon deal
    public AudioClip fireAudio;
    public AudioClip reloadAudio;

    [HideInInspector]
    public SC_WeaponManager manager;

    float nextFireTime = 0;
    bool canFire = true;
    int bulletsPerMagazineDefault = 0;
    AudioSource audioSource;

    // Start is called before the first frame update
    void Start()
    {
        bulletsPerMagazineDefault = bulletsPerMagazine;
        audioSource = GetComponent<AudioSource>();
        audioSource.playOnAwake = false;
        //Make sound 3D
        audioSource.spatialBlend = 1f;
    }

    // Update is called once per frame
    void Update()
    {
        if (Input.GetMouseButtonDown(0) && singleFire)
        {
            Fire();
        }
        if (Input.GetMouseButton(0) && !singleFire)
        {
            Fire();
        }
        if (Input.GetKeyDown(KeyCode.R) && canFire)
        {
            StartCoroutine(Reload());
        }
    }

    void Fire()
    {
        if (canFire)
        {
            if (Time.time > nextFireTime)
            {
                nextFireTime = Time.time + fireRate;

                if (bulletsPerMagazine > 0)
                {
                    //Point fire point at the current center of Camera
                    Vector3 firePointPointerPosition = manager.playerCamera.transform.position + manager.playerCamera.transform.forward * 100;
                    RaycastHit hit;
                    if (Physics.Raycast(manager.playerCamera.transform.position, manager.playerCamera.transform.forward, out hit, 100))
                    {
                        firePointPointerPosition = hit.point;
                    }
                    firePoint.LookAt(firePointPointerPosition);
                    //Fire
                    GameObject bulletObject = Instantiate(bulletPrefab, firePoint.position, firePoint.rotation);
                    SC_Bullet bullet = bulletObject.GetComponent<SC_Bullet>();
                    //Set bullet damage according to weapon damage value
                    bullet.SetDamage(weaponDamage);

                    bulletsPerMagazine--;
                    audioSource.clip = fireAudio;
                    audioSource.Play();
                }
                else
                {
                    StartCoroutine(Reload());
                }
            }
        }
    }

    IEnumerator Reload()
    {
        canFire = false;

        audioSource.clip = reloadAudio;
        audioSource.Play();

        yield return new WaitForSeconds(timeToReload);

        bulletsPerMagazine = bulletsPerMagazineDefault;

        canFire = true;
    }

    //Called from SC_WeaponManager
    public void ActivateWeapon(bool activate)
    {
        StopAllCoroutines();
        canFire = true;
        gameObject.SetActive(activate);
    }
}- 创建一个新脚本,将其命名为 "SC_Bullet" 并将以下代码粘贴到其中:
SC_Bullet.cs
using System.Collections;
using UnityEngine;

public class SC_Bullet : MonoBehaviour
{
    public float bulletSpeed = 345;
    public float hitForce = 50f;
    public float destroyAfter = 3.5f;

    float currentTime = 0;
    Vector3 newPos;
    Vector3 oldPos;
    bool hasHit = false;

    float damagePoints;

    // Start is called before the first frame update
    IEnumerator Start()
    {
        newPos = transform.position;
        oldPos = newPos;

        while (currentTime < destroyAfter && !hasHit)
        {
            Vector3 velocity = transform.forward * bulletSpeed;
            newPos += velocity * Time.deltaTime;
            Vector3 direction = newPos - oldPos;
            float distance = direction.magnitude;
            RaycastHit hit;

            // Check if we hit anything on the way
            if (Physics.Raycast(oldPos, direction, out hit, distance))
            {
                if (hit.rigidbody != null)
                {
                    hit.rigidbody.AddForce(direction * hitForce);

                    IEntity npc = hit.transform.GetComponent<IEntity>();
                    if (npc != null)
                    {
                        //Apply damage to NPC
                        npc.ApplyDamage(damagePoints);
                    }
                }

                newPos = hit.point; //Adjust new position
                StartCoroutine(DestroyBullet());
            }

            currentTime += Time.deltaTime;
            yield return new WaitForFixedUpdate();

            transform.position = newPos;
            oldPos = newPos;
        }

        if (!hasHit)
        {
            StartCoroutine(DestroyBullet());
        }
    }

    IEnumerator DestroyBullet()
    {
        hasHit = true;
        yield return new WaitForSeconds(0.5f);
        Destroy(gameObject);
    }

    //Set how much damage this bullet will deal
    public void SetDamage(float points)
    {
        damagePoints = points;
    }
}
现在,您会注意到 SC_Bullet 脚本有一些错误。这是因为我们还有最后一件事要做,那就是定义 IEntity 接口。
当您需要确保使用它的脚本已实现某些方法时,C# 中的接口 非常有用。
IEntity 接口将有一个方法,即ApplyDamage,稍后将用于对敌人和我们的玩家造成伤害。
- 创建一个新脚本,将其命名为 "SC_InterfaceManager" 并将以下代码粘贴到其中:
SC_InterfaceManager.cs
//Entity interafce
interface IEntity
{
    void ApplyDamage(float points);
}
设置武器管理器
武器管理器是一个位于主摄像机对象下并包含所有武器的对象。
- 创建一个新的游戏对象并为其命名 "WeaponManager"
- 将 WeaponManager 移动到玩家主摄像机内并将其位置更改为 (0, 0, 0)
- 将 SC_WeaponManager 脚本附加到 "WeaponManager"
- 将主摄像机分配给 SC_WeaponManager 中的玩家摄像机变量
设置步枪
- 将您的枪模型拖放到场景中(或者如果您还没有模型,则只需创建一个立方体并拉伸它)。
- 缩放模型,使其大小与玩家胶囊相关
就我而言,我将使用定制的步枪模型(BERGARA BA13):

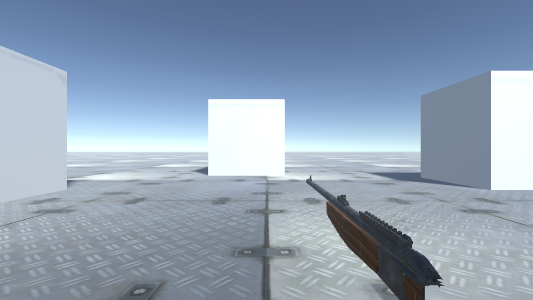
- 创建一个新的游戏对象并将其命名为"Rifle",然后将步枪模型移动到其中
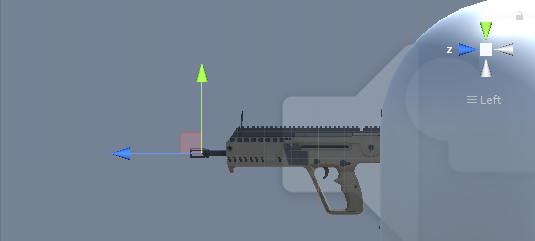
- 将 "Rifle" 对象移动到 "WeaponManager" 对象内并将其放置在相机前面,如下所示:
要修复对象剪切,只需将相机的近剪切平面更改为较小的值(在我的例子中,我将其设置为 0.15):
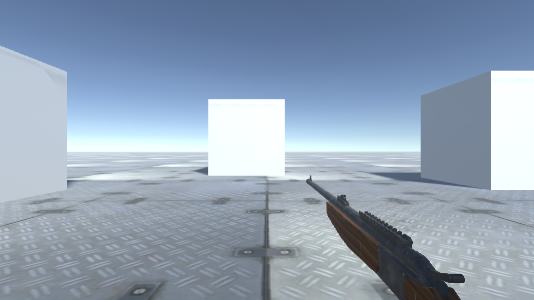
好多了。
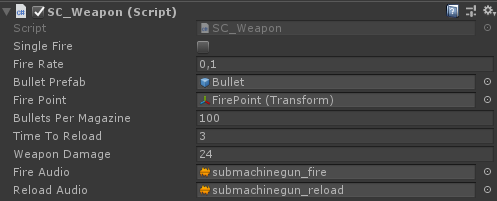
- 将 SC_Weapon 脚本附加到步枪对象(您会注意到它还添加了音频源组件,这是播放射击和重新加载音频所必需的)。
如您所见,SC_Weapon 有 4 个要分配的变量。如果您的项目中有合适的音频剪辑,您可以立即分配“Fire”音频和“Reload”音频变量。
Bullet Prefab 变量将在本教程后面进行解释。
现在,我们将只分配 Fire point 变量:
- 创建一个新的 GameObject,将其重命名为 "FirePoint" 并将其移动到 Rifle 对象内。将其放在桶的正前方或稍靠内侧的位置,如下所示:
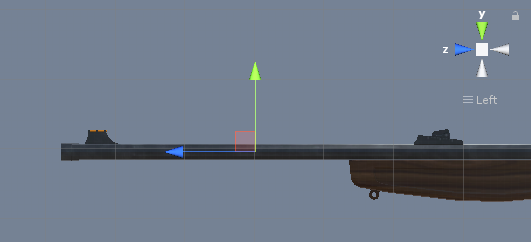
- 将 FirePoint 变换分配给 SC_Weapon 处的火点变量
- 在 SC_WeaponManager 脚本中将步枪分配给辅助武器变量
设置冲锋枪
- 复制 Rifle 对象并将其重命名为 Submachinegun
- 将里面的枪型号替换为其他型号(在我的例子中,我将使用 TAVOR X95 的定制型号)

- 移动火点变换直到它适合新模型
- 将 Submachinegun 分配给 SC_WeaponManager 脚本中的 Primary Weapon 变量

设置 Bullet 预制件
子弹预制件将根据武器的射速生成,并使用光线投射来检测它是否击中物体并造成伤害。
- 创建一个新的游戏对象并为其命名 "Bullet"
- 向其中添加 Trail Renderer 组件并将其 Time 变量更改为 0.1。
- 将宽度曲线设置为较低的值(例如,开始 0.1 结束 0),以添加看起来尖的轨迹
- 创建新材质并将其命名为bullet_trail_material并将其Shader更改为Particles/Additive
- 将新创建的材质分配给轨迹渲染器
- 将轨迹渲染器的颜色更改为不同的颜色(例如开始:亮橙色结束:深橙色)

- 将项目符号对象保存到 Prefab 并将其从场景中删除。
- 将新创建的预制件(从项目视图中拖放)分配给步枪和冲锋枪子弹预制件变量
冲锋枪:
步枪:

现在武器已经准备好了。
第 3 步:创建敌人 AI
敌人将是简单的立方体,它们跟随玩家并在足够接近时进行攻击。他们会一波一波地攻击,每一波都有更多的敌人需要消灭。
设置敌人人工智能
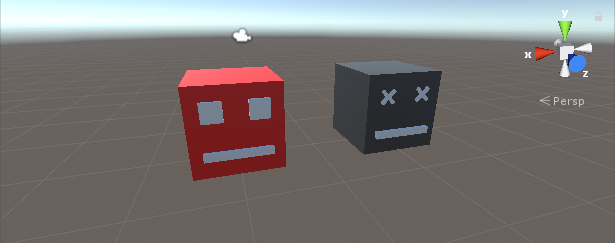
下面我创建了 Cube 的 2 种变体(左边的一个用于活动实例,右边的一个将在敌人被杀死后生成):
- 向死实例和活实例添加 Rigidbody 组件
- 将死亡实例保存到预制件并将其从场景中删除。
现在,活动实例将需要更多组件才能导航游戏关卡并对玩家造成伤害。
- 创建一个新脚本并将其命名为 "SC_NPCEnemy",然后将以下代码粘贴到其中:
SC_NPCEnemy.cs
using UnityEngine;
using UnityEngine.AI;

[RequireComponent(typeof(NavMeshAgent))]

public class SC_NPCEnemy : MonoBehaviour, IEntity
{
    public float attackDistance = 3f;
    public float movementSpeed = 4f;
    public float npcHP = 100;
    //How much damage will npc deal to the player
    public float npcDamage = 5;
    public float attackRate = 0.5f;
    public Transform firePoint;
    public GameObject npcDeadPrefab;

    [HideInInspector]
    public Transform playerTransform;
    [HideInInspector]
    public SC_EnemySpawner es;
    NavMeshAgent agent;
    float nextAttackTime = 0;

    // Start is called before the first frame update
    void Start()
    {
        agent = GetComponent<NavMeshAgent>();
        agent.stoppingDistance = attackDistance;
        agent.speed = movementSpeed;

        //Set Rigidbody to Kinematic to prevent hit register bug
        if (GetComponent<Rigidbody>())
        {
            GetComponent<Rigidbody>().isKinematic = true;
        }
    }

    // Update is called once per frame
    void Update()
    {
        if (agent.remainingDistance - attackDistance < 0.01f)
        {
            if(Time.time > nextAttackTime)
            {
                nextAttackTime = Time.time + attackRate;

                //Attack
                RaycastHit hit;
                if(Physics.Raycast(firePoint.position, firePoint.forward, out hit, attackDistance))
                {
                    if (hit.transform.CompareTag("Player"))
                    {
                        Debug.DrawLine(firePoint.position, firePoint.position + firePoint.forward * attackDistance, Color.cyan);

                        IEntity player = hit.transform.GetComponent<IEntity>();
                        player.ApplyDamage(npcDamage);
                    }
                }
            }
        }
        //Move towardst he player
        agent.destination = playerTransform.position;
        //Always look at player
        transform.LookAt(new Vector3(playerTransform.transform.position.x, transform.position.y, playerTransform.position.z));
    }

    public void ApplyDamage(float points)
    {
        npcHP -= points;
        if(npcHP <= 0)
        {
            //Destroy the NPC
            GameObject npcDead = Instantiate(npcDeadPrefab, transform.position, transform.rotation);
            //Slightly bounce the npc dead prefab up
            npcDead.GetComponent<Rigidbody>().velocity = (-(playerTransform.position - transform.position).normalized * 8) + new Vector3(0, 5, 0);
            Destroy(npcDead, 10);
            es.EnemyEliminated(this);
            Destroy(gameObject);
        }
    }
}- 创建一个新脚本,将其命名为 "SC_EnemySpawner",然后将以下代码粘贴到其中:
SC_EnemySpawner.cs
using UnityEngine;
using UnityEngine.SceneManagement;

public class SC_EnemySpawner : MonoBehaviour
{
    public GameObject enemyPrefab;
    public SC_DamageReceiver player;
    public Texture crosshairTexture;
    public float spawnInterval = 2; //Spawn new enemy each n seconds
    public int enemiesPerWave = 5; //How many enemies per wave
    public Transform[] spawnPoints;

    float nextSpawnTime = 0;
    int waveNumber = 1;
    bool waitingForWave = true;
    float newWaveTimer = 0;
    int enemiesToEliminate;
    //How many enemies we already eliminated in the current wave
    int enemiesEliminated = 0;
    int totalEnemiesSpawned = 0;

    // Start is called before the first frame update
    void Start()
    {
        //Lock cursor
        Cursor.lockState = CursorLockMode.Locked;
        Cursor.visible = false;

        //Wait 10 seconds for new wave to start
        newWaveTimer = 10;
        waitingForWave = true;
    }

    // Update is called once per frame
    void Update()
    {
        if (waitingForWave)
        {
            if(newWaveTimer >= 0)
            {
                newWaveTimer -= Time.deltaTime;
            }
            else
            {
                //Initialize new wave
                enemiesToEliminate = waveNumber * enemiesPerWave;
                enemiesEliminated = 0;
                totalEnemiesSpawned = 0;
                waitingForWave = false;
            }
        }
        else
        {
            if(Time.time > nextSpawnTime)
            {
                nextSpawnTime = Time.time + spawnInterval;

                //Spawn enemy
                if(totalEnemiesSpawned < enemiesToEliminate)
                {
                    Transform randomPoint = spawnPoints[Random.Range(0, spawnPoints.Length - 1)];

                    GameObject enemy = Instantiate(enemyPrefab, randomPoint.position, Quaternion.identity);
                    SC_NPCEnemy npc = enemy.GetComponent<SC_NPCEnemy>();
                    npc.playerTransform = player.transform;
                    npc.es = this;
                    totalEnemiesSpawned++;
                }
            }
        }

        if (player.playerHP <= 0)
        {
            if (Input.GetKeyDown(KeyCode.Space))
            {
                Scene scene = SceneManager.GetActiveScene();
                SceneManager.LoadScene(scene.name);
            }
        }
    }

    void OnGUI()
    {
        GUI.Box(new Rect(10, Screen.height - 35, 100, 25), ((int)player.playerHP).ToString() + " HP");
        GUI.Box(new Rect(Screen.width / 2 - 35, Screen.height - 35, 70, 25), player.weaponManager.selectedWeapon.bulletsPerMagazine.ToString());

        if(player.playerHP <= 0)
        {
            GUI.Box(new Rect(Screen.width / 2 - 85, Screen.height / 2 - 20, 170, 40), "Game Over\n(Press 'Space' to Restart)");
        }
        else
        {
            GUI.DrawTexture(new Rect(Screen.width / 2 - 3, Screen.height / 2 - 3, 6, 6), crosshairTexture);
        }

        GUI.Box(new Rect(Screen.width / 2 - 50, 10, 100, 25), (enemiesToEliminate - enemiesEliminated).ToString());

        if (waitingForWave)
        {
            GUI.Box(new Rect(Screen.width / 2 - 125, Screen.height / 4 - 12, 250, 25), "Waiting for Wave " + waveNumber.ToString() + " (" + ((int)newWaveTimer).ToString() + " seconds left...)");
        }
    }

    public void EnemyEliminated(SC_NPCEnemy enemy)
    {
        enemiesEliminated++;

        if(enemiesToEliminate - enemiesEliminated <= 0)
        {
            //Start next wave
            newWaveTimer = 10;
            waitingForWave = true;
            waveNumber++;
        }
    }
}- 创建一个新脚本,将其命名为 "SC_DamageReceiver",然后将以下代码粘贴到其中:
SC_DamageReceiver.cs
using UnityEngine;

public class SC_DamageReceiver : MonoBehaviour, IEntity
{
    //This script will keep track of player HP
    public float playerHP = 100;
    public SC_CharacterController playerController;
    public SC_WeaponManager weaponManager;

    public void ApplyDamage(float points)
    {
        playerHP -= points;

        if(playerHP <= 0)
        {
            //Player is dead
            playerController.canMove = false;
            playerHP = 0;
        }
    }
}- 将 SC_NPCEnemy 脚本附加到活动的敌人实例(您会注意到它添加了另一个名为 NavMesh Agent 的组件,这是导航 NavMesh 所必需的)
- 将最近创建的死亡实例预制件分配给 Npc Dead Prefab 变量
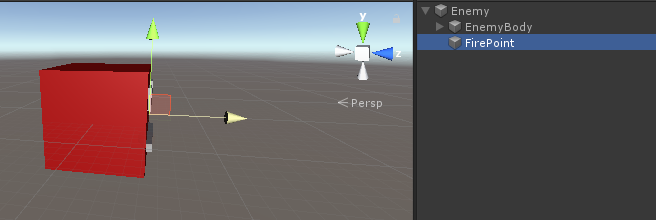
- 对于 Fire Point,创建一个新的 GameObject,将其移动到活动的敌人实例内并将其稍微放在实例前面,然后将其分配给 Fire Point 变量:
- 最后,将活动实例保存到 Prefab 并将其从 Scene 中删除。
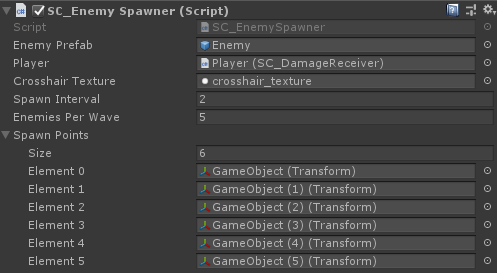
设置敌人生成器
现在让我们转向 SC_EnemySpawner。该脚本将在波浪中产生敌人,并且还会在屏幕上显示一些 UI 信息,例如玩家生命值、当前弹药、当前波浪中还剩下多少敌人等。
- 创建一个新的游戏对象并为其命名 "_EnemySpawner"
- 将 SC_EnemySpawner 脚本附加到它
- 将新创建的敌人 AI 分配给 Enemy Prefab 变量
- 将下面的纹理分配给十字线纹理变量

- 创建几个新的游戏对象并将它们放置在场景周围,然后将它们分配给 Spawn Points 数组
您会注意到还剩下最后一个变量需要分配,即 Player 变量。
- 将 SC_DamageReceiver 脚本附加到 Player 实例
- 将 Player 实例标签更改为 "Player"
- 在 SC_DamageReceiver 中分配玩家控制器和武器管理器变量

- 将 Player 实例分配给 SC_EnemySpawner 中的 Player 变量
最后,我们必须在场景中烘焙导航网格,以便敌人 AI 能够导航。
另外,在烘焙 NavMesh 之前,不要忘记将场景中的每个静态对象标记为导航静态:
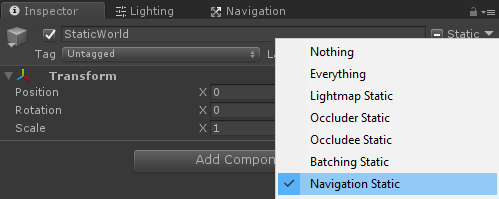
- 转到 NavMesh 窗口(窗口 -> AI -> 导航),单击 Bake 选项卡,然后单击 Bake 按钮。NavMesh 烘焙后,它应该看起来像这样:

现在是时候按下“播放”并测试它了:
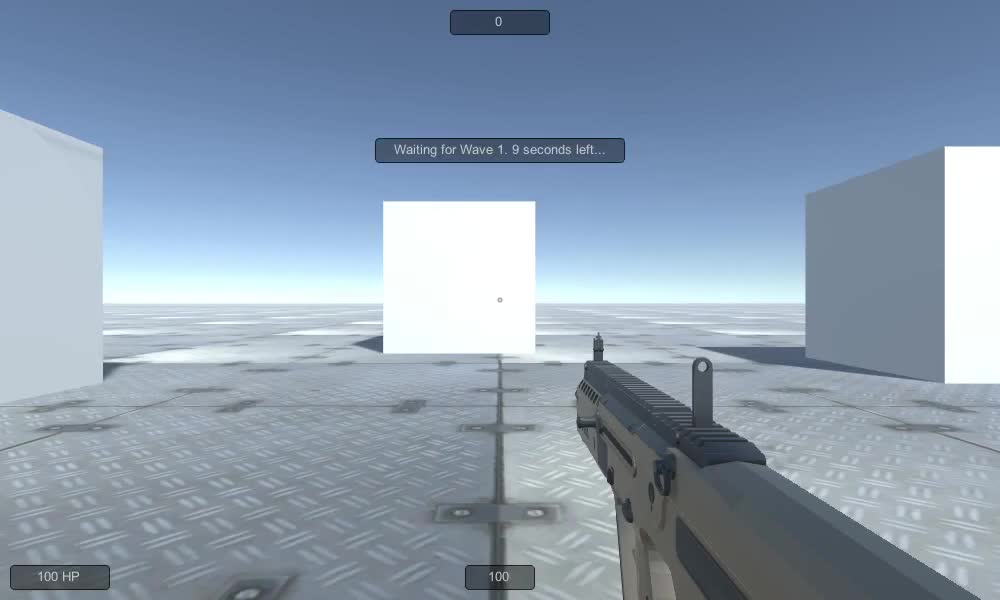
一切都按预期进行!