Unity 中的移动触摸输入操纵杆
要在手机游戏中制作可控制的角色,必须添加在屏幕上直观地呈现并响应触摸输入的按钮。
在本教程中,我将展示如何在 Unity 中创建一个类似操纵杆的按钮,该按钮主要适用于触摸屏手机上的移动控制。
您还可以使用下面的示例添加更多按钮和操纵杆。那么让我们开始吧!
第 1 步:创建所有必要的脚本
- 使用下面的源代码创建 两个 C# 脚本
MobileJoystick_UI.cs
using UnityEngine;
using UnityEngine.UI;

public class MobileJoystick_UI : MonoBehaviour
{

    //Mobile controller graphics
    public Sprite navigationCircle;
    public Sprite navigationButton;
    //Use this in your movement script for the input control
    public Vector2 moveDirection;
    //Joystick components size
    int circleSize = 120;
    int buttonSize = 100;
    //How far the joystick should be placed from the side of the screen
    int marginLeft = 100;
    //How far the joystick should be placed from the bottom of the screen
    int marginBottom = 100;

    Canvas mainCanvas;

    //Mobile movement
    [System.Serializable]
    public class JoystickButton
    {
        public Image backgroundCircle;
        public Image mainButton;
        public Rect defaultArea;
        public Vector2 touchOffset;
        public Vector2 currentTouchPos;
        public int touchID;
        public bool isActive = false;
    }

    //Move joystick data
    JoystickButton moveTouch = new JoystickButton();

    public static MobileJoystick_UI instance;

    // Start is called before the first frame update
    void Start()
    {
        if (instance != null)
        {
            //There is another instance already present, remove this one
            Destroy(gameObject);
            return;
        }
        //Assign this instance to a static variable so you can access the movement direction directly at MobileJoystick_UI.instance.moveDirection
        instance = this;

        //This function will initialize canvas element along with the joystick button
        GameObject tmpObj = new GameObject("Canvas");
        tmpObj.transform.position = Vector3.zero;
        mainCanvas = tmpObj.AddComponent<Canvas>();
        mainCanvas.renderMode = RenderMode.ScreenSpaceOverlay;
        mainCanvas.pixelPerfect = true;

        //Add Canvas Scaler component
        CanvasScaler canvasScaled = tmpObj.AddComponent<CanvasScaler>();
        canvasScaled.scaleFactor = 1;
        canvasScaled.referencePixelsPerUnit = 100;

        //Add Graphic Raycaster element
        tmpObj.AddComponent<GraphicRaycaster>();

        //Setup navigation background
        GameObject cntrlTmpObj = new GameObject("Movement Circle");
        cntrlTmpObj.transform.position = Vector3.zero;
        cntrlTmpObj.transform.parent = tmpObj.transform;
        moveTouch.backgroundCircle = cntrlTmpObj.AddComponent<Image>();
        moveTouch.backgroundCircle.sprite = navigationCircle;
        moveTouch.backgroundCircle.rectTransform.anchorMin = new Vector2(0, 0);
        moveTouch.backgroundCircle.rectTransform.anchorMax = new Vector2(0, 0);
        moveTouch.backgroundCircle.rectTransform.sizeDelta = new Vector2(circleSize, circleSize);
        moveTouch.backgroundCircle.rectTransform.pivot = new Vector2(0, 0);
        moveTouch.backgroundCircle.rectTransform.position = new Vector3(marginLeft, marginBottom, 0);

        //Navigation button
        cntrlTmpObj = new GameObject("Movement Button");
        cntrlTmpObj.transform.position = Vector3.zero;
        cntrlTmpObj.transform.parent = tmpObj.transform;
        moveTouch.mainButton = cntrlTmpObj.AddComponent<Image>();
        moveTouch.mainButton.sprite = navigationButton;
        moveTouch.mainButton.rectTransform.anchorMin = new Vector2(0, 0);
        moveTouch.mainButton.rectTransform.anchorMax = new Vector2(0, 0);
        moveTouch.mainButton.rectTransform.sizeDelta = new Vector2(buttonSize, buttonSize);
        moveTouch.mainButton.rectTransform.pivot = new Vector2(0, 0);
        moveTouch.mainButton.rectTransform.position = new Vector3(marginLeft + (circleSize - buttonSize) / 2, marginBottom + (circleSize - buttonSize) / 2, 0);

        //Save the default location of the joystick button to be used later for input detection
        moveTouch.defaultArea = new Rect(moveTouch.mainButton.rectTransform.position.x,
            moveTouch.mainButton.rectTransform.position.y,
            moveTouch.mainButton.rectTransform.sizeDelta.x,
            moveTouch.mainButton.rectTransform.sizeDelta.y);
    }

    // Update is called once per frame
    void Update()
    {
        //Handle joystick movement
#if (UNITY_ANDROID || UNITY_IOS || UNITY_WP8 || UNITY_WP8_1) && !UNITY_EDITOR
        //Mobile touch input
        for (var i = 0; i < Input.touchCount; ++i)
        {
            Touch touch = Input.GetTouch(i);

            if (touch.phase == TouchPhase.Began)
            {
                MobileButtonsCheck(new Vector2(touch.position.x, Screen.height - touch.position.y), touch.fingerId);
            }

            if (touch.phase == TouchPhase.Moved )
            {
                if(moveTouch.isActive && moveTouch.touchID == touch.fingerId)
                {
                    moveTouch.currentTouchPos = touch.position;
                }
            }

            if (touch.phase == TouchPhase.Ended || touch.phase == TouchPhase.Canceled)
            {
                MobileButtonStop(touch.fingerId);
            }
        }
#else
        //Desktop mouse input for editor testing
        if (Input.GetMouseButtonDown(0))
        {
            MobileButtonsCheck(new Vector2(Input.mousePosition.x, Screen.height - Input.mousePosition.y), -1);
        }

        if (Input.GetMouseButtonUp(0))
        {
            MobileButtonStop(-1);
        }

        moveTouch.currentTouchPos = Input.mousePosition;
#endif

        //Moving
        if (moveTouch.isActive)
        {
            moveTouch.mainButton.rectTransform.position = new Vector3(moveTouch.currentTouchPos.x - moveTouch.touchOffset.x, moveTouch.currentTouchPos.y - moveTouch.touchOffset.y);
            moveDirection.x = moveTouch.mainButton.rectTransform.position.x - moveTouch.defaultArea.x;
            moveDirection.y = moveTouch.mainButton.rectTransform.position.y - moveTouch.defaultArea.y;

            if (Mathf.Abs(moveDirection.x) < 19)
            {
                moveDirection.x = 0;
            }
            else
            {
                moveDirection.x = Mathf.Clamp(moveDirection.x / 75.000f, -1.000f, 1.000f);
            }

            if (Mathf.Abs(moveDirection.y) < 19)
            {
                moveDirection.y = 0;
            }
            else
            {
                moveDirection.y = Mathf.Clamp(moveDirection.y / 75.000f, -1.000f, 1.000f);
            }
        }
        else
        {
            moveTouch.mainButton.rectTransform.position = new Vector3(moveTouch.defaultArea.x, moveTouch.defaultArea.y);
            moveDirection = Vector2.zero;
        }
    }

    //Here we check if the clicked/tapped position is inside the joystick button
    void MobileButtonsCheck(Vector2 touchPos, int touchID)
    {
        //Move controller
        if (moveTouch.defaultArea.Contains(new Vector2(touchPos.x, Screen.height - touchPos.y)) && !moveTouch.isActive)
        {
            moveTouch.isActive = true;
            moveTouch.touchOffset = new Vector2(touchPos.x - moveTouch.defaultArea.x, Screen.height - touchPos.y - moveTouch.defaultArea.y);
            moveTouch.currentTouchPos = new Vector2(touchPos.x, Screen.height - touchPos.y);
            moveTouch.touchID = touchID;
        }
    }

    //Here we release the previously active joystick if we release the mouse button/finger from the screen
    void MobileButtonStop(int touchID)
    {
        if (moveTouch.isActive && moveTouch.touchID == touchID)
        {
            moveTouch.isActive = false;
            moveTouch.touchOffset = Vector2.zero;
            moveTouch.touchID = -1;
        }
    }
}
TouchPlayerController.cs
using UnityEngine;

public class TouchPlayerController : MonoBehaviour
{

    // Update is called once per frame
    void Update()
    {
        //Move Front/Back
        if (MobileJoystick_UI.instance.moveDirection.y != 0)
        {
            transform.Translate(transform.forward * Time.deltaTime * 2.45f * MobileJoystick_UI.instance.moveDirection.y, Space.World);
        }

        //Rotate Left/Right
        if (MobileJoystick_UI.instance.moveDirection.x != 0)
        {
            transform.Rotate(new Vector3(0, 14, 0) * Time.deltaTime * 4.5f * MobileJoystick_UI.instance.moveDirection.x, Space.Self);
        }
    }
}
第 2 步:使用上面的脚本设置一个简单的场景
- 创建新场景
- 创建一个新的 GameObject 并调用它 '_TouchInput'
- 将 MobileJoystick_UI 脚本附加到它
- 分配 'Navigation Circle' 和 'Navigation button' 变量。
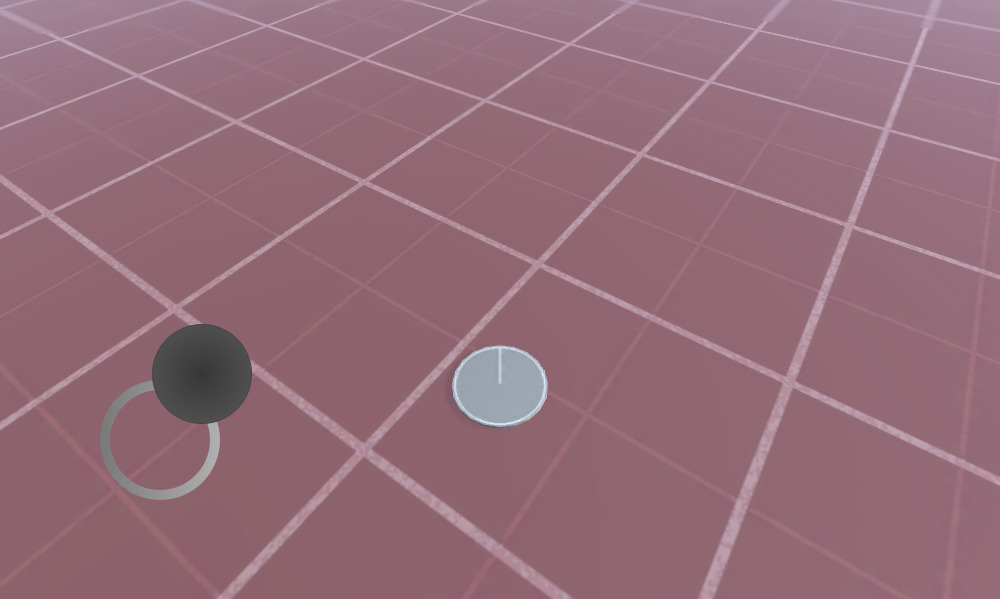
您可以使用下面的精灵或单击此处:


- 将它们导入到 Unity 后,确保将纹理类型更改为 'Sprite (2D and UI)'

第 3 步:设置播放器实例
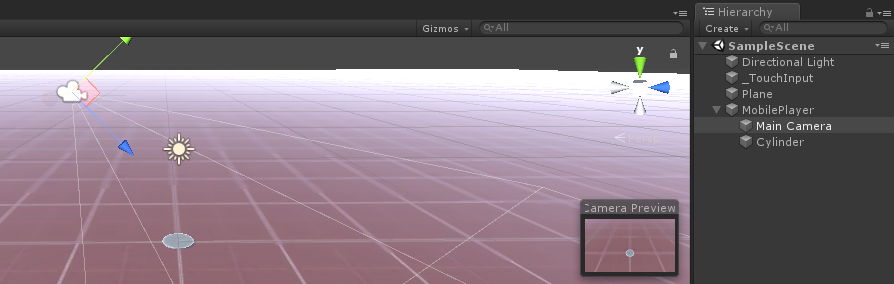
最后,我们设置玩家实例(在我的例子中,它将是一个简单的游戏对象,里面有一个圆柱体):
- 创建一个新的 GameObject 并调用它 'MobilePlayer'
- 将 TouchPlayerController 脚本附加到它
- 创建一个新的圆柱体并缩小其高度,直到它看起来几乎平坦(在我的例子中,比例为 (x: 1 y: 0.0142 z: 1) )
- 将圆柱体移动到 'MobilePlayer' 游戏对象内
- 出于测试目的,您还可以在 'MobilePlayer' 内移动主摄像头并旋转它,使其指向玩家,如下所示:
现在是时候按 Play 并查看一切是否正常。
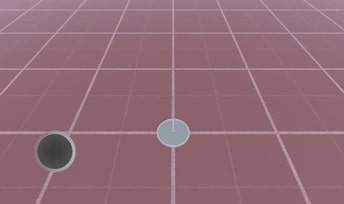
一切都按预期进行!通过移动操纵杆按钮来控制播放器。
MobileJoystick_UI 脚本支持移动触摸输入和鼠标单击(如果您在编辑器中玩)。