Unity 如何制作移动触摸控件
控件是视频游戏最重要的部分之一,毫不奇怪,它允许玩家与游戏世界互动。
游戏控制是通过硬件交互(鼠标/键盘、控制器、触摸屏等)发送的信号,然后由游戏代码处理,应用某些操作。
PC和游戏机都有可以按下的物理按钮,然而,现代移动设备只有几个物理按钮,其余的交互是通过触摸手势完成的,这意味着游戏按钮需要显示在屏幕上。这就是为什么在创建手机游戏时,在屏幕上显示所有按钮同时保持用户友好和整洁之间找到平衡非常重要。

在本教程中,我将展示如何使用 UI Canvas 在 Unity 中创建功能齐全的(操纵杆和按钮)移动控件。
第 1 步:创建所有必要的脚本
本教程包含 2 个脚本:SC_ClickTracker.cs 和 SC_MobileControls.cs。第一个脚本将侦听单击事件,第二个脚本将读取事件生成的值。
SC_ClickTracker.cs
using System.Collections;
using System.Collections.Generic;
using UnityEngine;
using UnityEngine.EventSystems;

#if UNITY_EDITOR
using UnityEditor;
#endif

public class SC_ClickTracker : MonoBehaviour, IPointerDownHandler, IDragHandler, IPointerUpHandler
{
    public string buttonName = ""; //This should be an unique name of the button
    public bool isJoystick = false;
    public float movementLimit = 1; //How far the joystick can be moved (n x Joystick Width)
    public float movementThreshold = 0.1f; //Minimum distance (n x Joystick Width) that the Joystick need to be moved to trigger inputAxis (Must be less than movementLimit)

    //Reference variables
    RectTransform rt;
    Vector3 startPos;
    Vector2 clickPos;

    //Input variables
    Vector2 inputAxis = Vector2.zero;
    bool holding = false;
    bool clicked = false;

    void Start()
    {
        //Add this button to the list
        SC_MobileControls.instance.AddButton(this);

        rt = GetComponent<RectTransform>();
        startPos = rt.anchoredPosition3D;
    }

    //Do this when the mouse is clicked over the selectable object this script is attached to.
    public void OnPointerDown(PointerEventData eventData)
    {
        //Debug.Log(this.gameObject.name + " Was Clicked.");

        holding = true;

        if (!isJoystick)
        {
            clicked = true;
            StartCoroutine(StopClickEvent());
        }
        else
        {
            //Initialize Joystick movement
            clickPos = eventData.pressPosition;
        }
    }

    WaitForEndOfFrame waitForEndOfFrame = new WaitForEndOfFrame();

    //Wait for next update then release the click event
    IEnumerator StopClickEvent()
    {
        yield return waitForEndOfFrame;

        clicked = false;
    }

    //Joystick movement
    public void OnDrag(PointerEventData eventData)
    {
        //Debug.Log(this.gameObject.name + " The element is being dragged");

        if (isJoystick)
        {
            Vector3 movementVector = Vector3.ClampMagnitude((eventData.position - clickPos) / SC_MobileControls.instance.canvas.scaleFactor, (rt.sizeDelta.x * movementLimit) + (rt.sizeDelta.x * movementThreshold));
            Vector3 movePos = startPos + movementVector;
            rt.anchoredPosition = movePos;

            //Update inputAxis
            float inputX = 0;
            float inputY = 0;
            if (Mathf.Abs(movementVector.x) > rt.sizeDelta.x * movementThreshold)
            {
                inputX = (movementVector.x - (rt.sizeDelta.x * movementThreshold * (movementVector.x > 0 ? 1 : -1))) / (rt.sizeDelta.x * movementLimit);
            }
            if (Mathf.Abs(movementVector.y) > rt.sizeDelta.x * movementThreshold)
            {
                inputY = (movementVector.y - (rt.sizeDelta.x * movementThreshold * (movementVector.y > 0 ? 1 : -1))) / (rt.sizeDelta.x * movementLimit);
            }
            inputAxis = new Vector2(inputX, inputY);
        }
    }

    //Do this when the mouse click on this selectable UI object is released.
    public void OnPointerUp(PointerEventData eventData)
    {
        //Debug.Log(this.gameObject.name + " The mouse click was released");

        holding = false;

        if (isJoystick)
        {
            //Reset Joystick position
            rt.anchoredPosition = startPos;
            inputAxis = Vector2.zero;
        }
    }

    public Vector2 GetInputAxis()
    {
        return inputAxis;
    }

    public bool GetClickedStatus()
    {
        return clicked;
    }

    public bool GetHoldStatus()
    {
        return holding;
    }
}

#if UNITY_EDITOR
//Custom Editor
[CustomEditor(typeof(SC_ClickTracker))]
public class SC_ClickTracker_Editor : Editor
{
    public override void OnInspectorGUI()
    {
        SC_ClickTracker script = (SC_ClickTracker)target;

        script.buttonName = EditorGUILayout.TextField("Button Name", script.buttonName);
        script.isJoystick = EditorGUILayout.Toggle("Is Joystick", script.isJoystick);
        if (script.isJoystick)
        {
            script.movementLimit = EditorGUILayout.FloatField("Movement Limit", script.movementLimit);
            script.movementThreshold = EditorGUILayout.FloatField("Movement Threshold", script.movementThreshold);
        }
    }
}
#endif
SC_MobileControls.cs
using System.Collections;
using System.Collections.Generic;
using UnityEngine;

public class SC_MobileControls : MonoBehaviour
{
    [HideInInspector]
    public Canvas canvas;
    List<SC_ClickTracker> buttons = new List<SC_ClickTracker>();

    public static SC_MobileControls instance;

    void Awake()
    {
        //Assign this script to static variable, so it can be accessed from other scripts. Make sure there is only one SC_MobileControls in the Scene.
        instance = this;

        canvas = GetComponent<Canvas>();
    }

    public int AddButton(SC_ClickTracker button)
    {
        buttons.Add(button);

        return buttons.Count - 1;
    }

    public Vector2 GetJoystick(string joystickName)
    {
        for(int i = 0; i < buttons.Count; i++)
        {
            if(buttons[i].buttonName == joystickName)
            {
                return buttons[i].GetInputAxis();
            }
        }

        Debug.LogError("Joystick with a name '" + joystickName + "' not found. Make sure SC_ClickTracker is assigned to the button and the name is matching.");

        return Vector2.zero;
    }

    public bool GetMobileButton(string buttonName)
    {
        for (int i = 0; i < buttons.Count; i++)
        {
            if (buttons[i].buttonName == buttonName)
            {
                return buttons[i].GetHoldStatus();
            }
        }

        Debug.LogError("Button with a name '" + buttonName + "' not found. Make sure SC_ClickTracker is assigned to the button and the name is matching.");

        return false;
    }

    public bool GetMobileButtonDown(string buttonName)
    {
        for (int i = 0; i < buttons.Count; i++)
        {
            if (buttons[i].buttonName == buttonName)
            {
                return buttons[i].GetClickedStatus();
            }
        }

        Debug.LogError("Button with a name '" + buttonName + "' not found. Make sure SC_ClickTracker is assigned to the button and the name is matching.");

        return false;
    }
}
第 2 步:设置移动控件
- 创建一个新的画布(游戏对象 -> UI -> 画布)
- 将 Canvas Scaler 中的 'UI Scale Mode' 更改为 'Scale With Screen Size' 并将参考分辨率更改为您正在使用的分辨率(在我的例子中为 1000 x 600)
- 将 SC_MobileControls 脚本附加到 Canvas 对象
- 右键单击画布对象 -> UI -> 图像
- 将新创建的图像重命名为 "JoystickLeft"
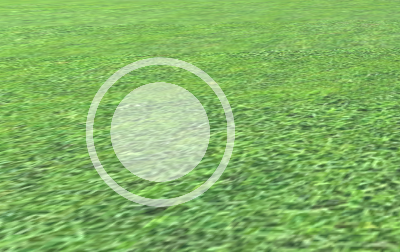
- 将 "JoystickLeft" Sprite 更改为空圆圈(导入到 Unity 后不要忘记将纹理类型更改为 'Sprite (2D and UI)')
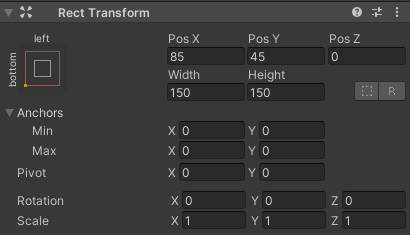
- 将 "JoystickLeft" 矩形变换值设置为与下面的 screenshot 中相同:
- 在 Image 组件中,将 Color alpha 设置为 0.5 以使精灵稍微透明:

- 复制 "JoystickLeft" 对象并将其重命名为 "JoystickLeftButton"
- 将 "JoystickLeftButton" 移动到 "JoystickLeft" 对象内
- 将 "JoystickLeftButton" Sprite 更改为实心圆:

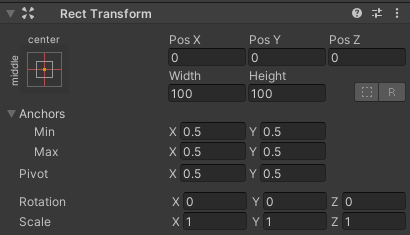
- 将 "JoystickLeftButton" 矩形变换值设置为与下面的屏幕截图相同:
- 添加按钮组件 "JoystickLeftButton"
- 在 Button 组件中将 Transition 更改为 'None'
- 将 SC_ClickTracker 脚本附加到 "JoystickLeftButton"
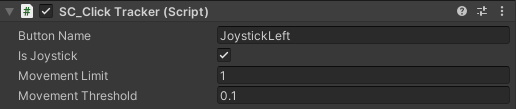
- 在 SC_ClickTracker 中,将按钮名称设置为任何唯一名称(在我的例子中,我将其设置为 'JoystickLeft')并启用 'Is Joystick' 复选框。
操纵杆按钮已准备就绪。你可以有任意数量的操纵杆(在我的例子中,我有 2 个,一个在左边控制移动,一个在右边控制旋转)。
- 复制 "JoystickLeft" 并将其重命名为 "JoystickRight"
- 展开 "JoystickRight" 并将 "JoystickLeftButton" 重命名为 "JoystickRightButton"
- 将 "JoystickRight" 矩形变换值设置为与下面的屏幕截图相同:

- 选择 "JoystickRightButton" 对象并在 SC_ClickTracker 中将按钮名称更改为 'JoystickRight'
第二个操纵杆已准备就绪。
现在让我们创建一个常规按钮:
- 右键单击画布对象 -> UI -> 按钮
- 将按钮对象重命名为 "SprintButton"
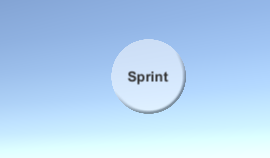
- 将 "SprintButton" Sprite 更改为具有斜角效果的圆形:

- 将 "SprintButton" 矩形变换值设置为与下面的屏幕截图相同:

- 将 "SprintButton" 图像颜色 alpha 更改为 0.5
- 将 SC_ClickTracker 脚本附加到 "SprintButton" 对象
- 在 SC_ClickTracker 中将按钮名称更改为 'Sprinting'
- 选择 "SprintButton" 内的文本对象并将其文本更改为 'Sprint',还将字体大小更改为 'Bold'
按钮已准备就绪。
我们将创建另一个名为 "Jump" 的按钮:
- 复制 "SprintButton" 对象并将其重命名为 "JumpButton"
- 将 "JumpButton" Pos Y 值更改为 250
- 在 SC_ClickTracker 中将按钮名称更改为 'Jumping'
- 将 "JumpButton" 内的文本更改为 'Jump'
最后一个按钮是 "Action":
- 复制 "JumpButton" 对象并将其重命名为 "ActionButton"
- 将 "ActionButton" Pos X 值更改为 -185
- 在 SC_ClickTracker 中将按钮名称更改为 'Action'
- 将 "ActionButton" 内的文本更改为 'Action'
第 3 步:实施移动控件
如果您按照上述步骤操作,现在可以使用这些函数在脚本中实现移动控件:
if(SC_MobileControls.instance.GetMobileButtonDown("BUTTON_NAME")){
	//Mobile button has been pressed one time, equivalent to if(Input.GetKeyDown(KeyCode...))
}

if(SC_MobileControls.instance.GetMobileButton("BUTTON_NAME")){
	//Mobile button is being held pressed, equivalent to if(Input.GetKey(KeyCode...))
}

//Get normalized direction of a on-screen Joystick
//Could be compared to: new Vector2(Input.GetAxis("Horizontal"), Input.GetAxis("Vertical")) or new Vector2(Input.GetAxis("Mouse X"), Input.GetAxis("Mouse Y"))
Vector2 inputAxis = SC_MobileControls.instance.GetJoystick("JOYSTICK_NAME");作为示例,我将使用本教程 中的 FPS 控制器来实现移动控件。首先按照该教程进行操作,非常简单。
如果您遵循该教程,您现在将拥有 "FPSPlayer" 对象以及带有移动控件的画布。
我们将保留桌面控件,同时实现移动控件,使其跨平台:
- 打开 SC_FPSController 脚本,滚动到第 28 行,然后删除此部分(删除该部分将防止光标被锁定,并允许在编辑器中单击移动控件。):
        // Lock cursor
        Cursor.lockState = CursorLockMode.Locked;
Cursor.visible = false;- 滚动到第 39 行并替换:
        bool isRunning = Input.GetKey(KeyCode.LeftShift);
        float curSpeedX = canMove ? (isRunning ? runningSpeed : walkingSpeed) * Input.GetAxis("Vertical") : 0;
float curSpeedY = canMove ? (isRunning ? runningSpeed : walkingSpeed) * Input.GetAxis("Horizontal") : 0;- 和:
        bool isRunning = Input.GetKey(KeyCode.LeftShift) || SC_MobileControls.instance.GetMobileButton("Sprinting");
        float curSpeedX = canMove ? (isRunning ? runningSpeed : walkingSpeed) * (Input.GetAxis("Vertical") + SC_MobileControls.instance.GetJoystick("JoystickLeft").y) : 0;
float curSpeedY = canMove ? (isRunning ? runningSpeed : walkingSpeed) * (Input.GetAxis("Horizontal") + SC_MobileControls.instance.GetJoystick("JoystickLeft").x) : 0;- 向下滚动到第 45 行并替换:
if (Input.GetButton("Jump") && canMove && characterController.isGrounded)- 和:
if ((Input.GetButton("Jump") || SC_MobileControls.instance.GetMobileButtonDown("Jumping")) && canMove && characterController.isGrounded)- 向下滚动到第 68 行并替换:
            rotationX += -Input.GetAxis("Mouse Y") * lookSpeed;
            rotationX = Mathf.Clamp(rotationX, -lookXLimit, lookXLimit);
            playerCamera.transform.localRotation = Quaternion.Euler(rotationX, 0, 0);
transform.rotation *= Quaternion.Euler(0, Input.GetAxis("Mouse X") * lookSpeed, 0);- 和:
#if UNITY_IPHONE || UNITY_ANDROID || UNITY_EDITOR
            rotationX += -(SC_MobileControls.instance.GetJoystick("JoystickRight").y) * lookSpeed;
#else
            rotationX += -Input.GetAxis("Mouse Y") * lookSpeed;
#endif
            rotationX = Mathf.Clamp(rotationX, -lookXLimit, lookXLimit);
            playerCamera.transform.localRotation = Quaternion.Euler(rotationX, 0, 0);
#if UNITY_IPHONE || UNITY_ANDROID || UNITY_EDITOR
            transform.rotation *= Quaternion.Euler(0, SC_MobileControls.instance.GetJoystick("JoystickRight").x * lookSpeed, 0);
#else
            transform.rotation *= Quaternion.Euler(0, Input.GetAxis("Mouse X") * lookSpeed, 0);
#endif
由于外观移动会干扰编辑器中的操纵杆测试,因此我们使用 #if 进行 特定于平台的编译 将移动逻辑与其余平台分开。
Mobile FPS 控制器现已准备就绪,让我们测试一下:
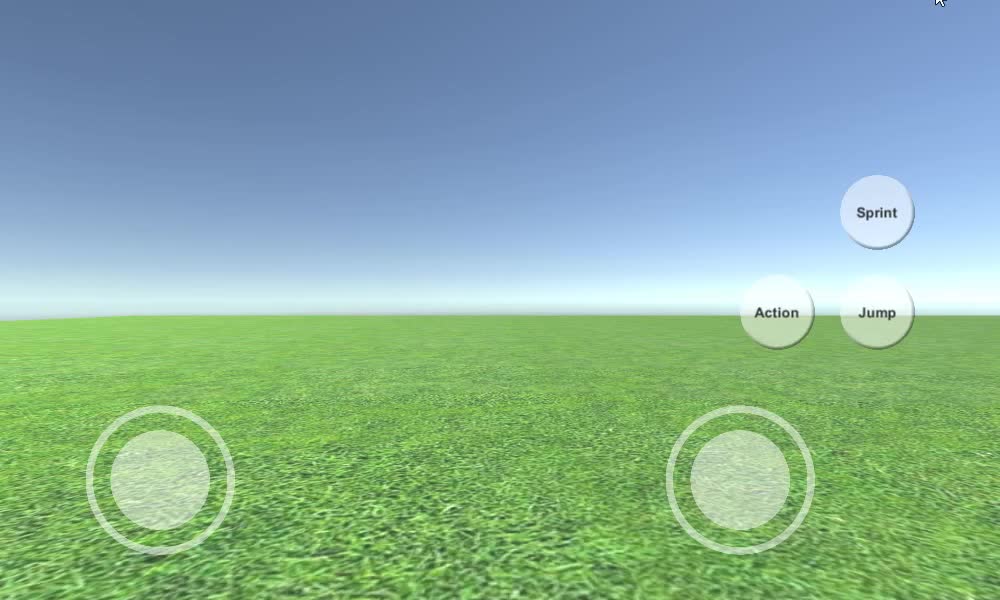
如您所见,所有操纵杆和按钮均可用("Action" 按钮除外,该按钮由于没有合适的功能而未实现)。