在 Unity 中制作龙卷风物理
在本教程中,我们将在 Unity 内创建龙卷风模拟。
Unity 本教程使用的版本:Unity 2018.3.0f2(64位)
第 1 步:创建所有必要的脚本
本教程需要 2 个脚本:
SC_Caught.cs
//This script is attached automatically to each Object caught in Tornado

using UnityEngine;

public class SC_Caught : MonoBehaviour
{
    private SC_Tornado tornadoReference;
    private SpringJoint spring;
    [HideInInspector]
    public Rigidbody rigid;

    // Use this for initialization
    void Start()
    {
        rigid = GetComponent<Rigidbody>();
    }

    // Update is called once per frame
    void Update()
    {
        //Lift spring so objects are pulled upwards
        Vector3 newPosition = spring.connectedAnchor;
        newPosition.y = transform.position.y;
        spring.connectedAnchor = newPosition;
    }

    void FixedUpdate()
    {
        //Rotate object around tornado center
        Vector3 direction = transform.position - tornadoReference.transform.position;
        //Project
        Vector3 projection = Vector3.ProjectOnPlane(direction, tornadoReference.GetRotationAxis());
        projection.Normalize();
        Vector3 normal = Quaternion.AngleAxis(130, tornadoReference.GetRotationAxis()) * projection;
        normal = Quaternion.AngleAxis(tornadoReference.lift, projection) * normal;
        rigid.AddForce(normal * tornadoReference.GetStrength(), ForceMode.Force);

        Debug.DrawRay(transform.position, normal * 10, Color.red);
    }

    //Call this when tornadoReference already exists
    public void Init(SC_Tornado tornadoRef, Rigidbody tornadoRigidbody, float springForce)
    {
        //Make sure this is enabled (for reentrance)
        enabled = true;

        //Save tornado reference
        tornadoReference = tornadoRef;

        //Initialize the spring
        spring = gameObject.AddComponent<SpringJoint>();
        spring.spring = springForce;
        spring.connectedBody = tornadoRigidbody;

        spring.autoConfigureConnectedAnchor = false;

        //Set initial position of the caught object relative to its position and the tornado
        Vector3 initialPosition = Vector3.zero;
        initialPosition.y = transform.position.y;
        spring.connectedAnchor = initialPosition;
    }

    public void Release()
    {
        enabled = false;
        Destroy(spring);
    }
}
SC_Tornado.cs
//Tornado script controls tornado physics

using System.Collections.Generic;
using UnityEngine;

public class SC_Tornado : MonoBehaviour
{
    [Tooltip("Distance after which the rotation physics starts")]
    public float maxDistance = 20;

    [Tooltip("The axis that the caught objects will rotate around")]
    public Vector3 rotationAxis = new Vector3(0, 1, 0);

    [Tooltip("Angle that is added to the object's velocity (higher lift -> quicker on top)")]
    [Range(0, 90)]
    public float lift = 45;

    [Tooltip("The force that will drive the caught objects around the tornado's center")]
    public float rotationStrength = 50;

    [Tooltip("Tornado pull force")]
    public float tornadoStrength = 2;

    Rigidbody r;

    List<SC_Caught> caughtObject = new List<SC_Caught>();

    // Start is called before the first frame update
    void Start()
    {
        //Normalize the rotation axis given by the user
        rotationAxis.Normalize();

        r = GetComponent<Rigidbody>();
        r.isKinematic = true;
    }

    void FixedUpdate()
    {
        //Apply force to caught objects
        for (int i = 0; i < caughtObject.Count; i++)
        {
            if(caughtObject[i] != null)
            {
                Vector3 pull = transform.position - caughtObject[i].transform.position;
                if (pull.magnitude > maxDistance)
                {
                    caughtObject[i].rigid.AddForce(pull.normalized * pull.magnitude, ForceMode.Force);
                    caughtObject[i].enabled = false;
                }
                else
                {
                    caughtObject[i].enabled = true;
                }
            }
        }
    }

    void OnTriggerEnter(Collider other)
    {
        if (!other.attachedRigidbody) return;
        if (other.attachedRigidbody.isKinematic) return;

        //Add caught object to the list
        SC_Caught caught = other.GetComponent<SC_Caught>();
        if (!caught)
        {
            caught = other.gameObject.AddComponent<SC_Caught>();
        }

        caught.Init(this, r, tornadoStrength);

        if (!caughtObject.Contains(caught))
        {
            caughtObject.Add(caught);
        }
    }

    void OnTriggerExit(Collider other)
    {
        //Release caught object
        SC_Caught caught = other.GetComponent<SC_Caught>();
        if (caught)
        {
            caught.Release();

            if (caughtObject.Contains(caught))
            {
                caughtObject.Remove(caught);
            }
        }
    }

    public float GetStrength()
    {
        return rotationStrength;
    }

    //The axis the caught objects rotate around
    public Vector3 GetRotationAxis()
    {
        return rotationAxis;
    }

    //Draw tornado radius circle in Editor
    void OnDrawGizmosSelected()
    {
        Vector3[] positions = new Vector3[30];
        Vector3 centrePos = transform.position;
        for (int pointNum = 0; pointNum < positions.Length; pointNum++)
        {
            // "i" now represents the progress around the circle from 0-1
            // we multiply by 1.0 to ensure we get a fraction as a result.
            float i = (float)(pointNum * 2) / positions.Length;

            // get the angle for this step (in radians, not degrees)
            float angle = i * Mathf.PI * 2;

            // the X & Y position for this angle are calculated using Sin & Cos
            float x = Mathf.Sin(angle) * maxDistance;
            float z = Mathf.Cos(angle) * maxDistance;

            Vector3 pos = new Vector3(x, 0, z) + centrePos;
            positions[pointNum] = pos;
        }

        Gizmos.color = Color.cyan;
        for (int i = 0; i < positions.Length; i++)
        {
            if (i == positions.Length - 1)
            {
                Gizmos.DrawLine(positions[0], positions[positions.Length - 1]);
            }
            else
            {
                Gizmos.DrawLine(positions[i], positions[i + 1]);
            }
        }
    }
}![]()
第 2 步:创建龙卷风
1. 创建龙卷风粒子:
- 创建一个新的 GameObject(GameObject -> Create Empty)并为其命名 "Tornado"
- 创建另一个 GameObject 并将其命名为 "Particles",将其移动到 "Tornado" 内并将其位置更改为 (0, 0, 0)
- 将 粒子系统组件添加到 "Particles" 游戏对象
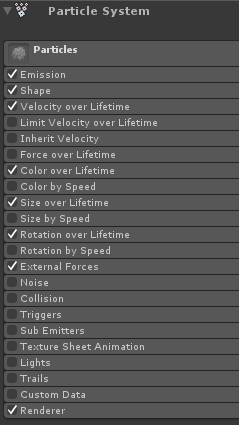
- 在粒子系统中启用以下模块:发射、形状、生命周期内的速度、生命周期内的颜色、生命周期内的大小 、生命周期内的旋转、外力、渲染器。
2. 为每个粒子系统模块分配值(检查下面的屏幕截图):
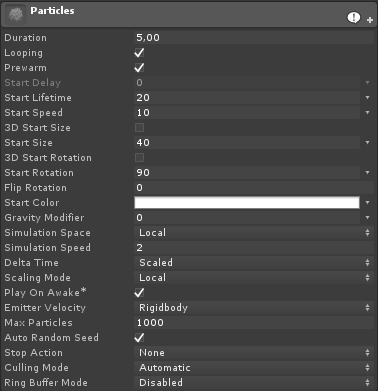
主(粒子)模块:
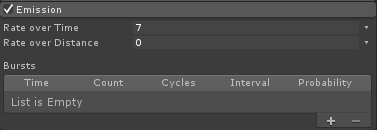
发射模块:
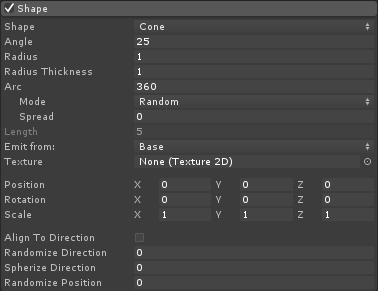
形状模块:
生命周期速度模块:

生命周期颜色模块:
![]()

(每端 2 个灰色,内部 2 个白色)
模块使用寿命内的尺寸:

(Size over Lifetime 使用的曲线如下所示):
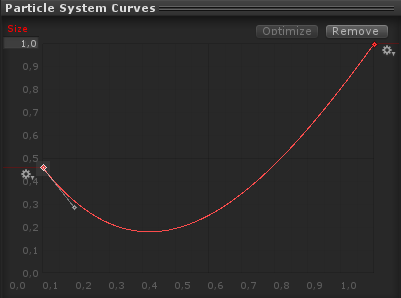
(尺寸先小后大)
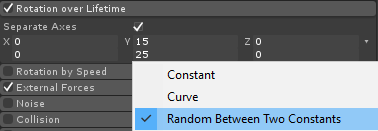
生命周期内的轮换:
外力模块:
该模块不需要任何更改,只需保留默认值即可。
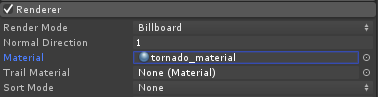
渲染器模块:
对于这个模块,我们只需要分配以下材料:
- 创建一个新材质并命名 "tornado_material"
- 将其着色器更改为 "Legacy Shaders/Particles/Alpha Blended"
- 将下面的纹理分配给它(或单击此处):
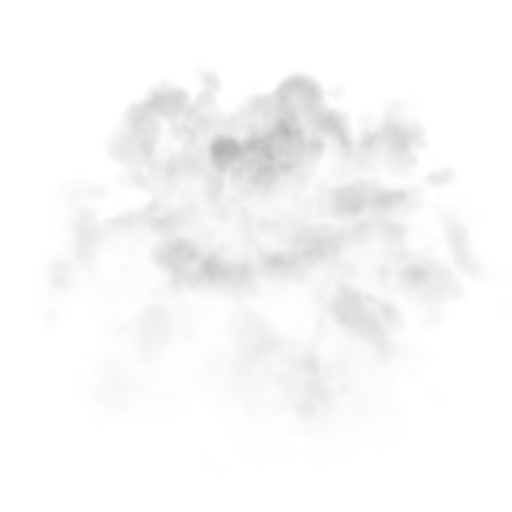
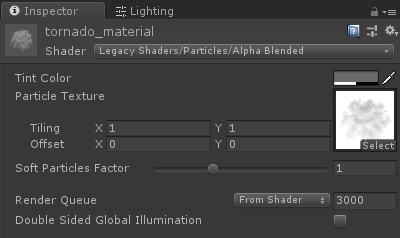
- 将tornado_material分配给渲染器模块:
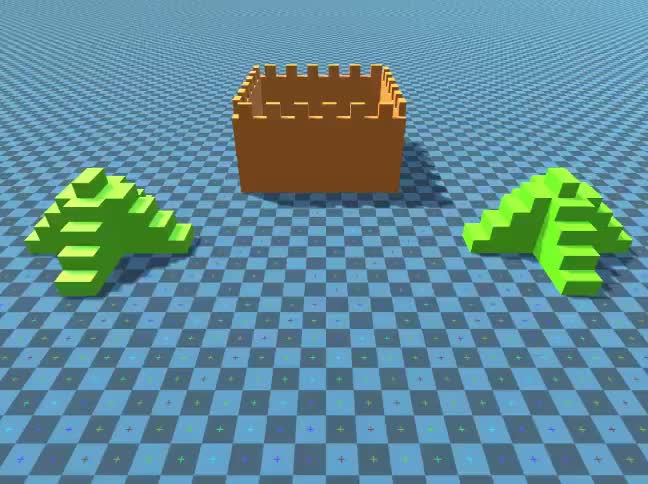
现在龙卷风粒子应该看起来像这样:
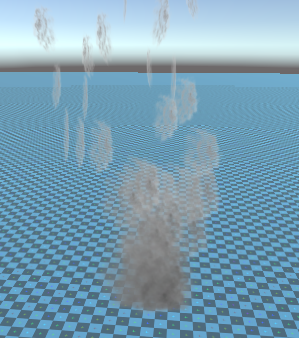
但正如你所看到的,它看起来根本不像龙卷风,那是因为我们还需要添加一个组件,那就是粒子系统力场,需要这个组件来模拟圆形风:
- 创建一个新的游戏对象并为其命名 "ForceField"
- 将 "ForceField" 移动到 "Tornado" 游戏对象内并将其位置更改为 (0, 0, 0)

- 添加粒子系统力场组件 "ForceField"
- 将力场组件的值更改为与下面的屏幕截图相同:
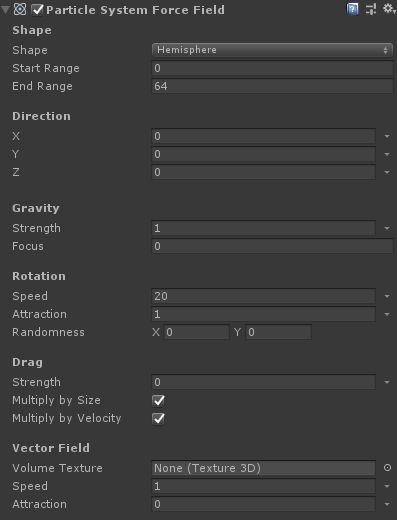
现在粒子应该看起来像这样,这要好得多:

3. 设置龙卷风物理
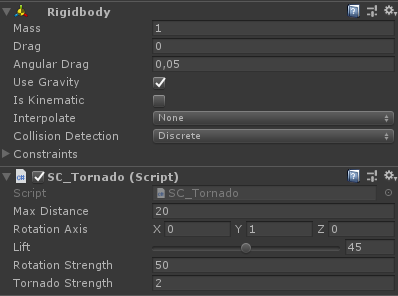
- 将 Rigidbody 和 SC_Tornado 组件添加到 "Tornado" GameObject
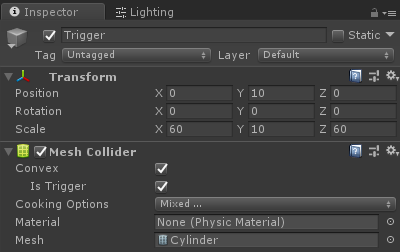
- 创建一个新的游戏对象并为其命名 "Trigger"
- 将 "Trigger" 移动到 "Tornado" GameObject 内,并将其位置更改为 (0, 10, 0),并将其比例更改为 (60, 10, 60)
- 将 MeshCollider 组件添加到 "Trigger" GameObject,选中 Convex 和 IsTrigger 复选框,并将其 Mesh 更改为默认 Cylinder
龙卷风现在准备好了!
要测试它,只需创建一个立方体并添加一个刚体组件,然后将其放置在触发器区域内。
一旦按下“播放立方体”,龙卷风就会将其拉入:
